
Introduction
Ah the Phospholipid Badge Addon! This ended up being my favorite part of the CTF this year, and frankly the one that took up most of my time. A highlight for me every year at NSEC are the hardware tracks. I do not get many opportunities to dive into hardware-based, hands-on, CTF challenges remotely, so when I attend an event in person and I can do so I jump right in. NSEC has done a great job building on previous versions, such as The Horse Pt. 1 and The Horse Pt. 2, and this year frankly outdid themselves by essentially providing three separate experiences on the same badge. When it was originally whispered through the grapevine that the conference badge, which while had no embedded flags did provide an interesting social challenge, would be used for the CTF itself, I was curious how they would approach it. I am happy to say I was first in line to get the CTF firmware flashed as they opened, and outright floored when a further addon Phospholipid portion was dropped off at our team’s table.
This writeup will focus only on the Phospholipid addon of the badge. I plan on potentially adding other writeups focusing on the CTF firmware and conference social aspects afterwards. During the closing ceremony an overview of the completion rates was provided and it partially shocked me that while I had managed to solve ECDH (which only two other teams completed), I woefully missed out on the another_128 during the CTF. That was rectified afterwards and frankly is a testament to the quality and enjoyment I had as even after the CTF I continued to hack away at the addon.
![]()
Lastly, before we dive in to the track, I want to thank all the NSEC staff, volunteers, and challenge designers for making the event as special as it always is. I’d also like to thank my teammates from Cyber Crew, it would not have been the same experience without you all. Lastly, I want to explicitly thank Jonathan Marcil for designing this Phospholipid addon track, as well as entertaining my questions after the close of the CTF. I learned a ridiculous amount as a result, and I hope that this writeup at least provides some justice to how good of an experience it was.
With that, let’s jump in!
Phospholipid Addon
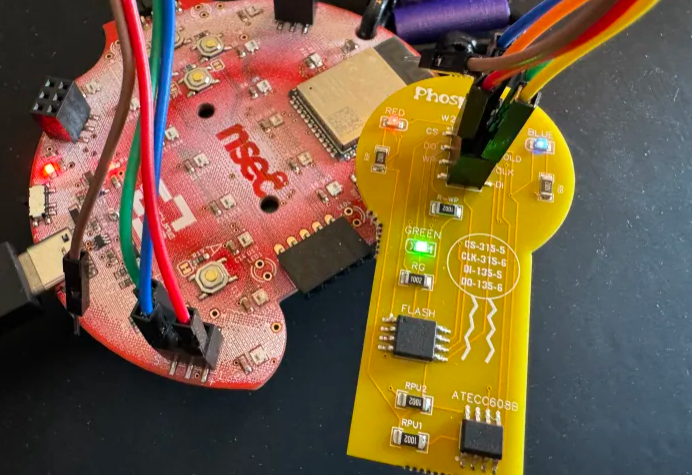
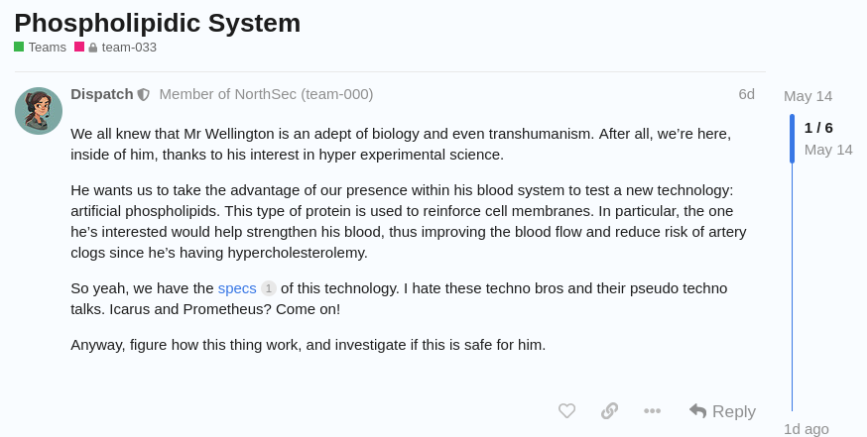
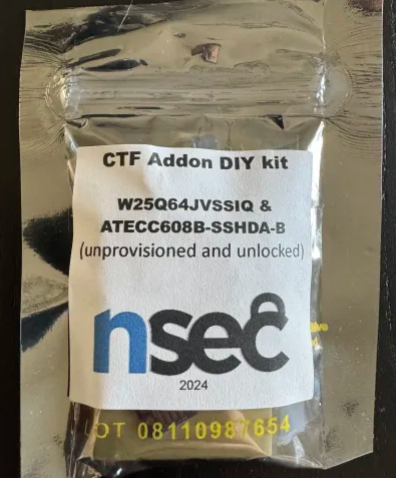
This journey started off with a hand-delivery to the team’s table as well as a new forum post.
The spec sheet provided excellent information and forshadowed an overall theme of this track - reading the docs!
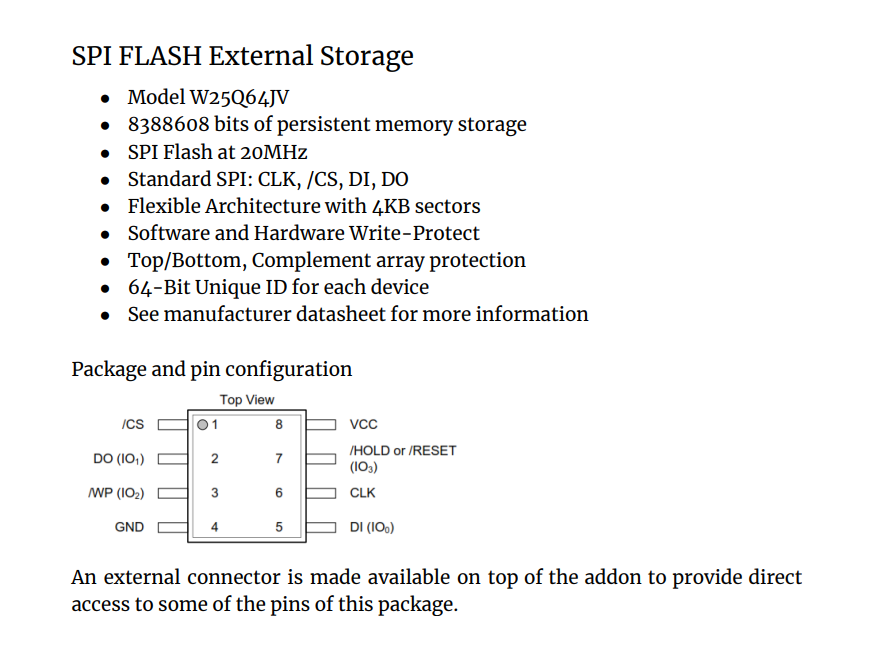

Ok good information on what we will be dealing with. I’ve learned my lesson the hard way once before! I decided to read fully through the datasheet before attempting to connect anything else.
Plug Me
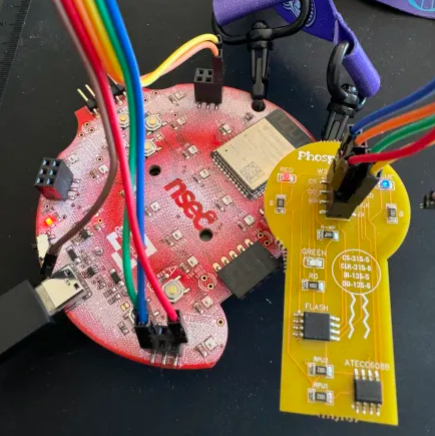
The datasheet provided instructions on how to wire the addon to our conference badge, indicators to look at like the blue LED to make sure everything was correct, and an overview of the commands we could expect to see once the addon firmware was installed and activated. I thought this part was a smart way to introduce the concepts to anyone who had not worked with hardware before and provided just enough of a challenge that it was not trivial.
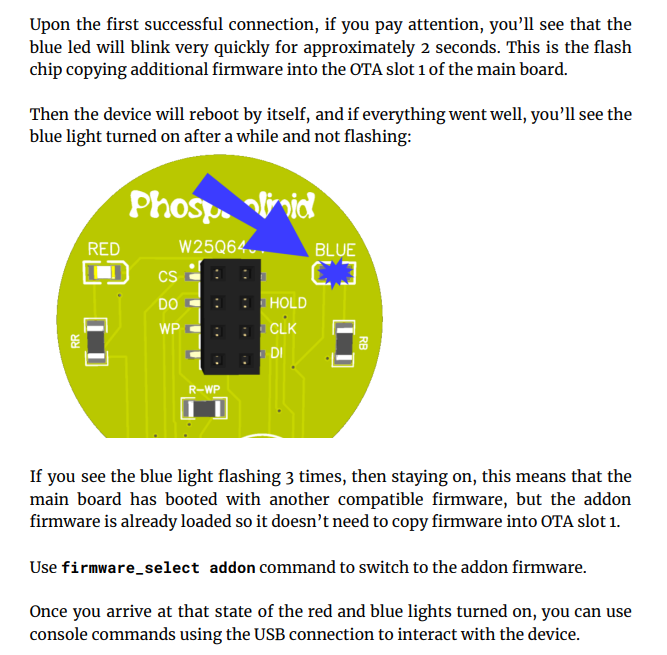
Once everything was connected cable wise, our serial connection was established, and we rebooted the badge, we were greeted with a few nice lines of debug, again foreshadowing for later, and our first flag!
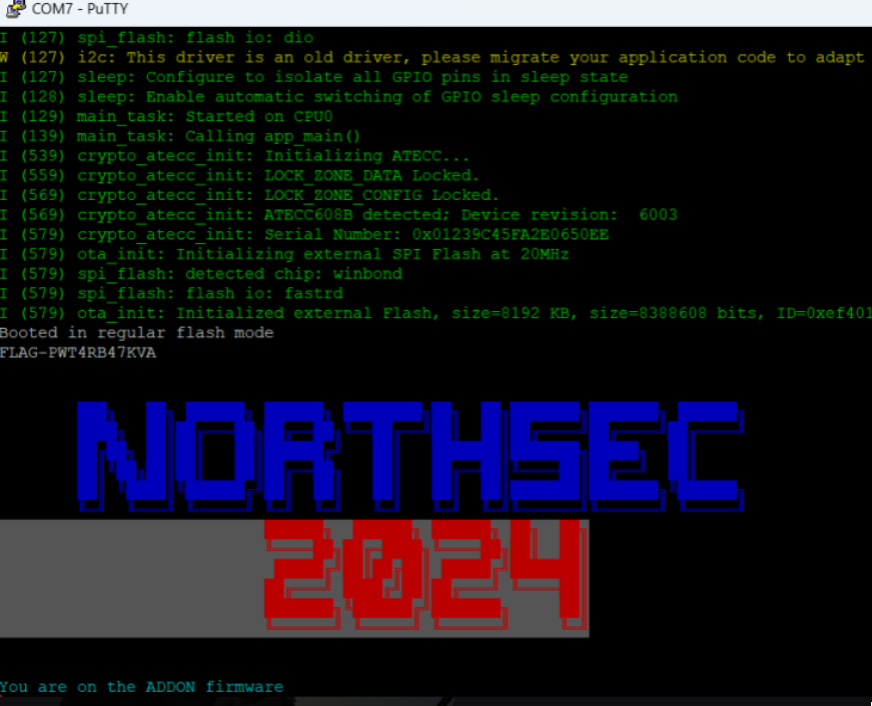
└─$ ./askgod submit FLAG-PWT4RB47KVA
Congratulations, you score your team 3 points!
Message: All plugged in and ready to go!
Flash Dump
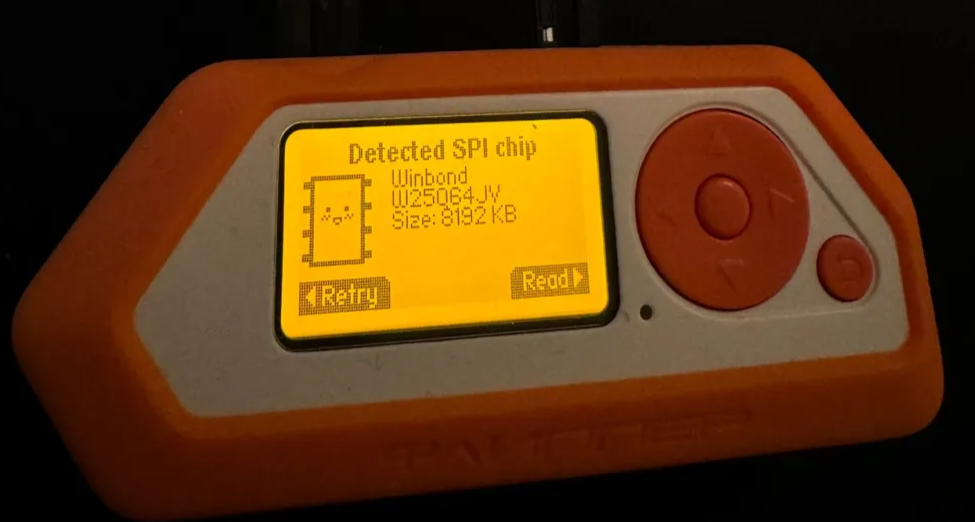
Almost immediately this is where I deviated from the intended path. Instead of diving into the challenges through the serial console, I looked at the addon and asked myself “how can I dump this firmware?”. My experience up to now had been with esp32-style chips and using esptool so this was a new challenge for me. Looking for similar tooling for W25Q64JV chips did not come up with anything useful, so I decided to take a more generic approach. Let’s see if I can get it using my Flipper Zero! Side note, I loved that the FZ made an appearance at the Hacker Jeopardy night.

After a quick bit of googling (specific verbiage for Jonathan Marcil to cringe at) I quickly found SPI Mem Manager. With the wiring connection provided it should hopefully just be a matter of connect the dots. Small problem however… looking back at the datasheet provided with the addon, we see that the VCC/GND of the chip isn’t hooked up to the 2x4 connector on top of the addon.

In retrospect, despite the fog of the CTF I should have realized I could easily connect VCC/GND from the 2x3 SAO connector on the bottom of the addon without any more complicated cables. But where is the fun in doing things the simple way!
Ok, this might be a challenge (narrator voice But it shouldn’t have been - see note above). I doubt I can hold cables on the flash pins steadily enough to make it work. Thankfully my buddy Boschko hooked me up with a few extra connectors and it was stable enough to read properly!
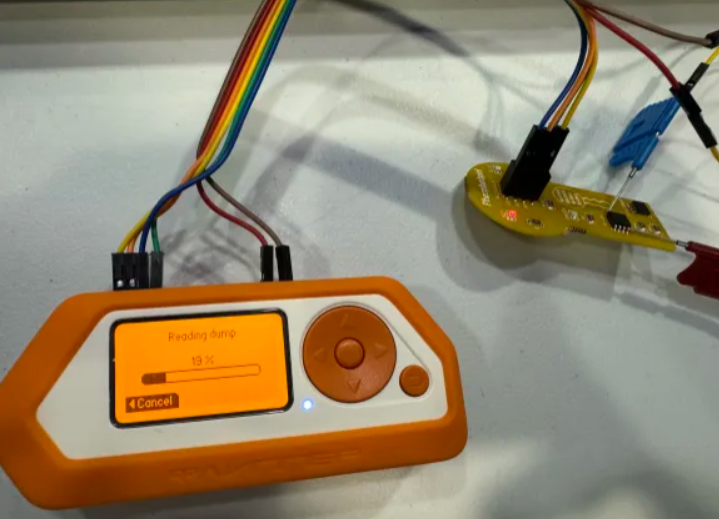
After getting the firmware over to my VM a quick strings and we got the first actual flag, and a bonus (more on that at the end of the writeup).

Read First 128
Alright, we got this flag already from the dump, but what was the inteded way to do this? Going down this path is fundamental as it will teach us to work with the addon hardware more directly, and the knowledge will be required to do the second flag. So let’s step through that command and see if we can read?
Well that doesn’t look great… what can we do? If we go back to the datasheet we can see probably why we can’t write.
WP: Write Protect; optional connection for SPI FLASHOk, that seems interesting. Let’s go find the W25Q64JV vendor spec sheets as well if there is more information. Again, this will end up being useful moreso for the next flag, but let’s see what it says about the WP.

Interesting. If we go back to the provided Phospholipid datasheet there is one more clue.
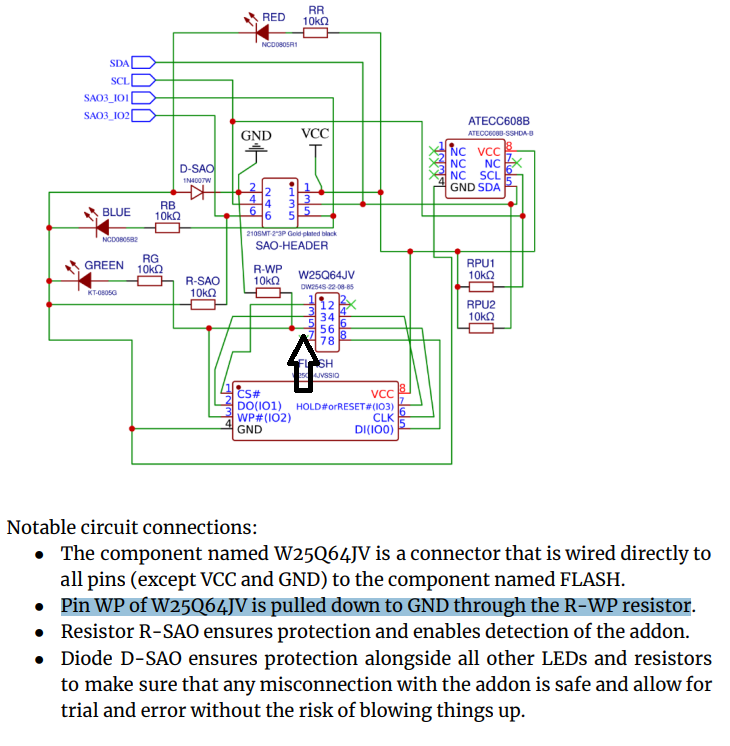
Ok, ok. In theory, if we are able to pull up the WP, we might be able to successfully write. Let’s connect the WP pin to an SAO VCC pin and… well a new green led has lit up, so far so good.

But if we try to writing… still no luck. Oh wait, if we careful read the documentation above this only impacts the ability to write to Status Registers. Wait, we saw that in the initial recon. Let’s jump into SPI mode using raw_toggle.
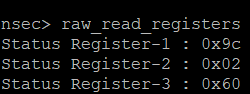
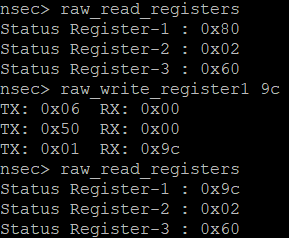
What does this even mean? Back to the datasheets! We seem to be able to control Register1 with the command raw_write_register1 so let’s focus on what that one does.

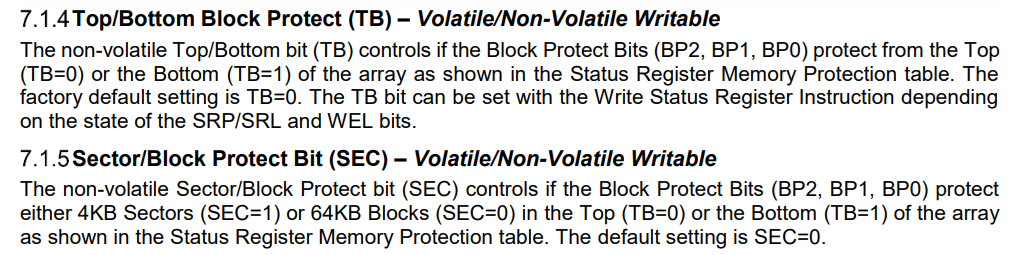
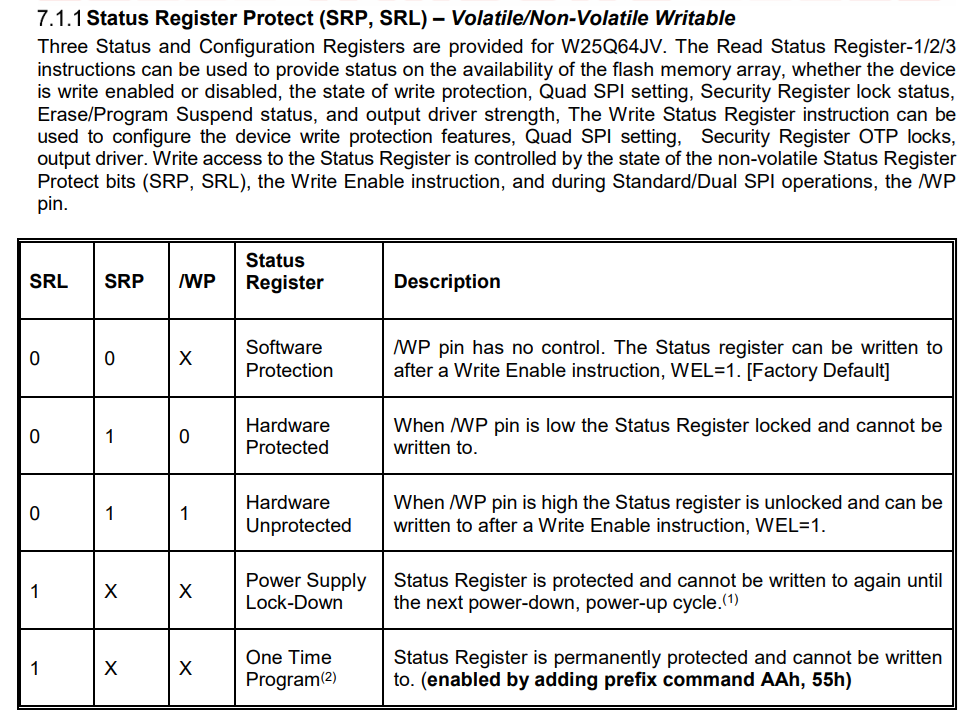
Since the register is currently 0x9C, or 10011100, we can tell that:
- SRP is 1
- Block protect bits are all set
- We understand by pulling up WP we moved it to
Hardware Unprotectedwhich hopefully confirms our suspicion with being able to write the register
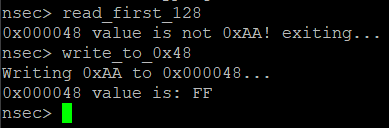
Those block protect bits seem suspicious. Let’s try to remove those and see if we can then write our 0xAA value in the regular mode. Removing those bits gives us the register value of 10000000, or 0x80. Here goes…something?!
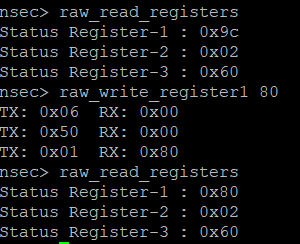
Well at least it looks like it stuck! Let’s go ahead and toggle raw mode back over and see if we can get our flag the proper way!
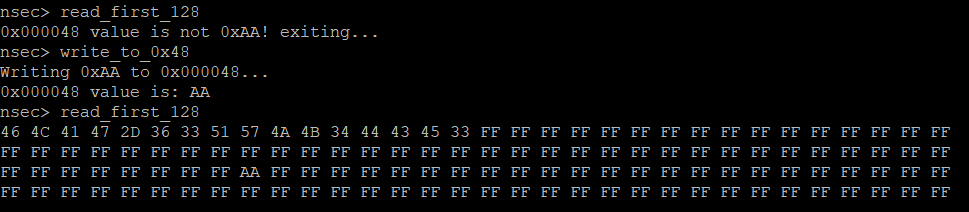
Yes! I smell a flag.
Excellent. Alright that’s now two ways to get the first flag. Time to move on to the next one.
Read Another 128
With the modifications from the first flag in, let’s try the next command.

Well, we did just allow ourselves to write, so let’s go back and reset the register to see if that helps.

Closer! So we need to block writing at 0x050048 but be able to write at 0x080048. Hum… up to now we have more or less turned on the ability to write or not. Back to the datasheets!
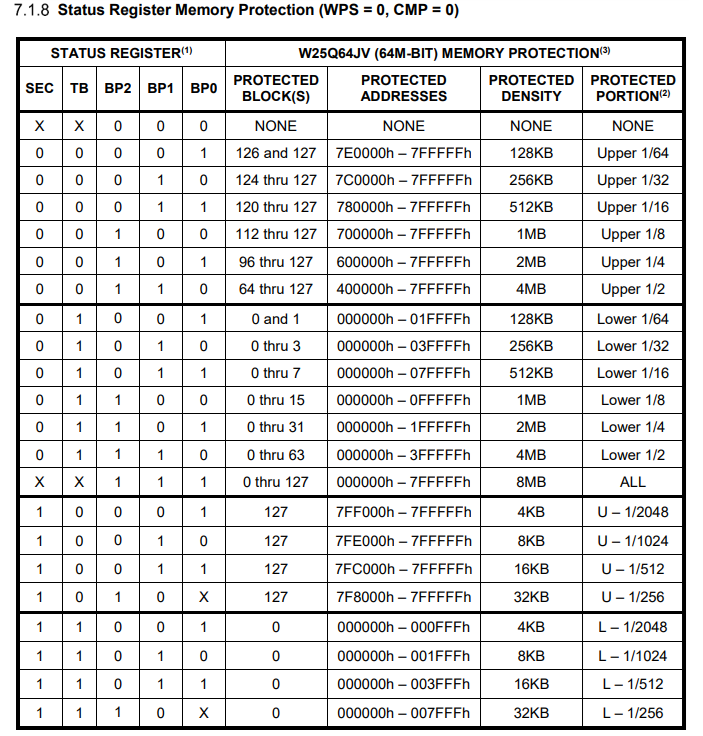
It seems we should be able to control arbitrary areas of memory protection. That seems exactly like what we need. We have our required addresses, so let’s find the combination that will work for us. It looks like there is only one.

Alright so the register should be 00101100 or 0x2C. Let’s set the register and give the command another shot.
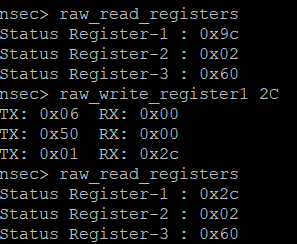
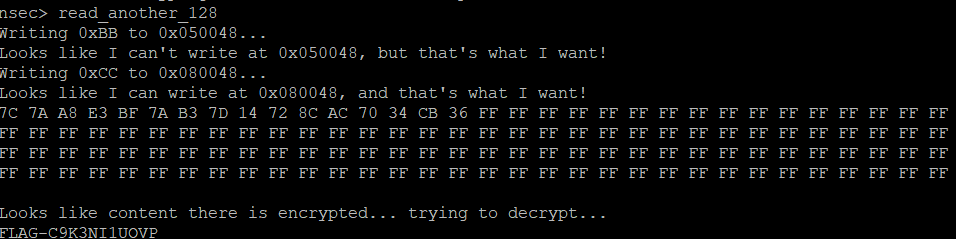
And there we go! Our knowledge of the W25Q64JV chip has come in handy and we now know how to control registers and protect memory.
Crypto Read Zone
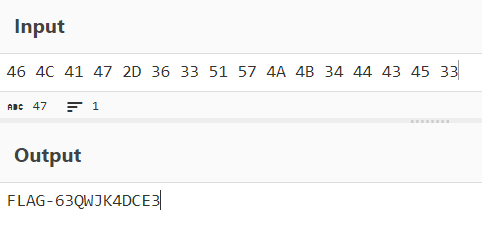
I have to admit I kind of stumbled onto this one. I started enumerating the slots and blocks I could read with the crypto_read_zone command and ran into:
nsec> crypto_read_zone 8 8
I'll only read block 8 in slot 8 if block 5 in slot 8 starts with 0x42! Exiting...
nsec>
Well good thing we have a crypto_write32_from_hex command as well. Let’s see if we can add a 0x42 as the first byte.

And sure enough, there’s our flag!
└─$ ./askgod submit FLAG-QKANDCND2XT
Congratulations, you score your team 2 points!
Message: Yup there’s a flag there, in clear, in the crypto chip! 
Crypto HMAC
Time for the next command!
nsec> crypto_hmac_rnd
Performing HMAC of random number as string 682310489 with SLOT ID 9...
First 32 chars result: E71E378AD6C2A8CBD0BE46C8D2E2B64D
Can you generate a HMAC of 138160109146 in the same way?
Submit the first uppercased 32 chars of that appended to FLAG-.
Ok, if we are able to read the value of slot 9, we should be able to get the key to perform the arbitrary HMAC.

Excellent, we have everything we need now to perform the HMAC and use the first 32 bits as the flag.
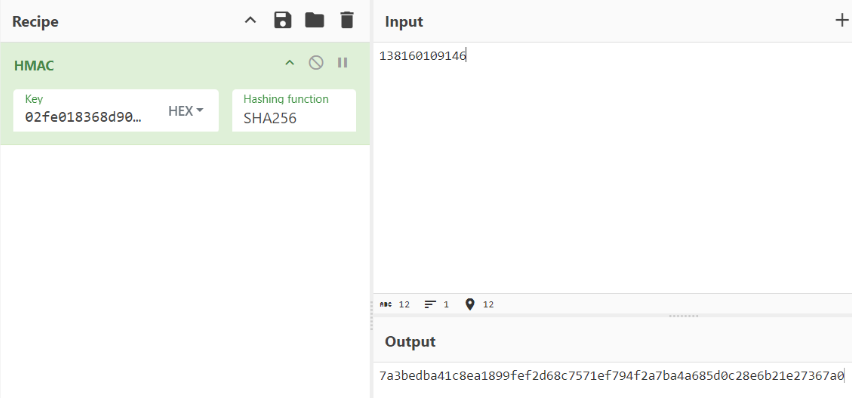
└─$ ./askgod submit FLAG-7a3bedba41c8ea1899fef2d68c7571ef
Congratulations, you score your team 3 points!
Message: This was easy right? You know how to look at data now… 
Crypto ECDH
Time to step into the deep end! Crypto ECDH ended up being my favorite challenge of NSEC2024. It required combining the experience we’ve gathered with commands on the addon and building on how real-world crypto operates. I have to admit when I finally understood what we needed to do with this challenge, created my own P256 keypair and was able to successfully trigger the comparison, it felt great. I’ll step through how I solved this, but know this was after hours of scratching my head, failed attempts, and a ridiculous amount of searching online. Alright, let’s start with what we know.
crypto_ECDH_premaster_secret  [hex chars]
  Validate the provided hex string matches the calculated premaster secret.
  Using private key from slot 2 and user provided public key in slot 13.
We know how to read, and there is a specific command for crypto_print_pubkey, so let’s see what that looks like.
nsec> crypto_print_pubkey 2
I (3804018) crypto_atecc:
-----BEGIN PUBLIC KEY-----
MFkwEwYHKoZIzj0CAQYIKoZIzj0DAQcDQgAEIMX9S1hBPDm7NfCScFg2QUXkBC6z
TAAe4raf3nTI554LrnS3vK95j0Ockrd3SVbVv/KZv+JqwtsIwzOliXzgIg==
-----END PUBLIC KEY-----
Well that looks like a public key alright. The command also mentioned a provided public key in slot 13. Let’s see what’s there.
nsec> crypto_read_zone 13 0
Data read successfully from slot 13: ffffffffffffffffffffffffffffffffffffffffffffffffffffffffffffffff
nsec> crypto_read_zone 13 1
Data read successfully from slot 13: ffffffffffffffffffffffffffffffffffffffffffffffffffffffffffffffff
nsec> crypto_read_zone 13 2
Data read successfully from slot 13: ffffffffffffffff000000000000000000000000000000000000000000000000
nsec>
Ok that looks less good. Probably why the command mentions user provided. Last thing before we dive into some theory, let’s try submitting something.
nsec> crypto_ECDH_premaster_secret 42
Error! hex string should be 64 characters
nsec> crypto_ECDH_premaster_secret 4242424242424242424242424242424242424242424242424242424242424242
addon-components/esp-cryptoauthlib/cryptoauthlib/lib/calib/calib_ecdh.c:80:f4:calib_ecdh_base - execution failed
Error! Failed to generate ECDH premaster secret with error: 0xF4
nsec>
Hum, well that’s not ideal. But let’s keep that filename in the back of our heads. Now let’s start with the basics. What are we even trying to do? What is a ECDH premaster secret?
- During the TLS handshake, the client and server negotiate cryptographic parameters, including the choice of cipher suite.
- If ECDH is selected, both parties generate random key pairs (private keys and corresponding public keys).
- The client sends its public key to the server, and the server sends its public key to the client.
- Using the received public keys and their own private keys, both parties compute a shared secret (the ECDH premaster secret).
Ok, this is starting to make sense. We don’t have access to the private key on the badge, but we are able to print out the public key. Combining that with our research above, to calculate a premaster secret, we would need to do a few different things.
- Generate our own EC keypair
- Upload our public key to slot 13
- Use our private key with the badge’s public key to compute the ECDH premaster secret
- Call the
crypto_ECDH_premaster_secretwith our premaster secret value
What should happen then in theory is that badge computes its premaster secret value, using its own private key and the public key we provided at which point the value should match what we provided. Great, “in theory”, we know what to do. Now all that’s left is actually doing it…
Generate Keypair
To generate the proper keypair, we should probably understand what parameters are being used by the badge. I ended up finding a nice GitHub repo that looked quite useful - https://github.com/espressif/esp-cryptoauthlib. Recognize the name from the error message above? From the repo:
This is a port of Microchip’s cryptoauthlib for ESP-IDF. It contains necessary build support to use cryptoauthlib with ESP-IDF as well as esp_cryptoauthlib_utility for configuring and provisiong ATECC608A chip connected to an ESP module. Currently the utility is supported for ESP32, ESP32S3 and ESP32C3
If we start going into the various scripts we end up at the calib_ecdh.c file responsible for ECDH calculations on the addon.
\param[in] public_key Public key input to ECDH calculation. X and Y
integers in big-endian format. 64 bytes for P256 key.
That’s not an outright smoking gun, but I decided to throw a few select attributes into copilot and see what it would come up with.
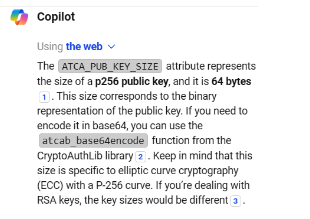
Ok, looks like we are working with P256 EC keys. Great, all that was left for this step was to use openssl to generate a keypair.
openssl ecparam -name prime256v1 -genkey -noout -out private.ec.key
openssl pkcs8 -topk8 -in private.ec.key -out private-me.pem
openssl ec -in private.pem -pubout -out public-me.pem
cat public-me.pem
-----BEGIN PUBLIC KEY-----
MFkwEwYHKoZIzj0CAQYIKoZIzj0DAQcDQgAEtrBu7yJwqJs+0u4gV2PvDhCqeWRo
XVPhwDK0n518T0cUD8wjo0QfcGVEM/YqMFvwH64xL9GqWwy33HxXJaXcYg==
-----END PUBLIC KEY-----That is looking similar to what we got from the badge, so I’ll assume it is correct for the moment. Let’s see how we get that on to the badge now.
Compute ECDH premaster secret
Taking the badge’s public key from above and moving it to the VM it only takes a few lines of python to compute the premaster secret.
from cryptography.hazmat.primitives.asymmetric import ec
from cryptography.hazmat.primitives import serialization

# Read my private key from a file
with open('private-me.pem', 'rb') as f:
    me_private_key = serialization.load_pem_private_key(f.read(), password=None)

# Read badges public key from a file
with open('public-badge.pem', 'rb') as f:
    badge_public_key = serialization.load_pem_public_key(f.read())

me_shared_secret = me_private_key.exchange(ec.ECDH(), badge_public_key)
shared_secret_hex = me_shared_secret.hex()
print("Shared Secret (Hex):", shared_secret_hex)
python ecdh.py
Shared Secret (Hex): cec266a95c1b68cc3b4e26d6cdecc91f003cb1f61f5f79632ae5709fc915c5edAssuming we didn’t royally screw something up, we have our value! Let’s see how we can get our public key on to the badge.
Upload public key
I originally asked myself “alright, now what” as I didn’t have a good idea how to start here. We know how to write to a specific slots in blocks, but we also have a limited amount of space to write to - 72 bytes. This seems to line up with the documentation above however as it states that the public keys should be 64 bytes. If we figure out what to write it should be block 13 slots 1 and 2.
The first assumption I made was that I could take out the header and footers and focus on the base64 encoded information only. Well that is still 124 characters and too large. Let’s decode the b64 and see if anything makes sense.
└─$ echo "MFkwEwYHKoZIzj0CAQYIKoZIzj0DAQcDQgAEIMX9S1hBPDm7NfCScFg2QUXkBC6zTAAe4raf3nTI554LrnS3vK95j0Ockrd3SVbVv/KZv+JqwtsIwzOliXzgIg==" | base64 -d | xxd
00000000: 3059 3013 0607 2a86 48ce 3d02 0106 082a  0Y0...*.H.=....*
00000010: 8648 ce3d 0301 0703 4200 0420 c5fd 4b58  .H.=....B.. ..KX
00000020: 413c 39bb 35f0 9270 5836 4145 e404 2eb3  A<9.5..pX6AE....
00000030: 4c00 1ee2 b69f de74 c8e7 9e0b ae74 b7bc  L......t.....t..
00000040: af79 8f43 9c92 b777 4956 d5bf f299 bfe2  .y.C...wIV......
00000050: 6ac2 db08 c333 a589 7ce0 22              j....3..|."
That’s not super useful, but, let’s see what happens when we do the same for our own public key.
└─$ echo "MFkwEwYHKoZIzj0CAQYIKoZIzj0DAQcDQgAEtrBu7yJwqJs+0u4gV2PvDhCqeWRoXVPhwDK0n518T0cUD8wjo0QfcGVEM/YqMFvwH64xL9GqWwy33HxXJaXcYg==" | base64 -d | xxd
00000000: 3059 3013 0607 2a86 48ce 3d02 0106 082a  0Y0...*.H.=....*
00000010: 8648 ce3d 0301 0703 4200 04b6 b06e ef22  .H.=....B....n."
00000020: 70a8 9b3e d2ee 2057 63ef 0e10 aa79 6468  p..>.. Wc....ydh
00000030: 5d53 e1c0 32b4 9f9d 7c4f 4714 0fcc 23a3  ]S..2...|OG...#.
00000040: 441f 7065 4433 f62a 305b f01f ae31 2fd1  D.peD3.*0[...1/.
00000050: aa5b 0cb7 dc7c 5725 a5dc 62              .[...|W%..b
Oh-ho! The first 27 bytes are the same? Let’s see if we can get some clarity on that. A quick search in the cryptoauthlib repo and I found this section in the pkcs11_key.c file.
/** ASN.1 Header for SECP256R1 public keys */
static const uint8_t ec_pubkey_asn1_header[] = {
    0x30, 0x59, 0x30, 0x13, 0x06, 0x07, 0x2A, 0x86,
    0x48, 0xCE, 0x3D, 0x02, 0x01, 0x06, 0x08, 0x2A,
    0x86, 0x48, 0xCE, 0x3D, 0x03, 0x01, 0x07, 0x03,
    0x42, 0x00, 0x04
};
Alright that definitely makes sense. What solidified my thinking was that once you removed the header from the base64 decoded public key material… we are left with exactly 64 bytes!
With everything we’ve learned, that means the 64 bytes representing our public key that needs to be written to memory is:
b6b06eef2270a89b3ed2ee205763ef0e10aa7964685d53e1c032b49f9d7c4f47140fcc23a3441f70654433f62a305bf01fae312fd1aa5b0cb7dc7c5725a5dc62
We know how to do that, so let’s get it done.

And as a last note before we try with our computed premaster secret, during the CTF I noticed that once a valid public-key was added the crypto_ECDH_premaster_secret command no longer errored out, further reinforcing that we were on the right path.
nsec> crypto_ECDH_premaster_secret 4242424242424242424242424242424242424242424242424242424242424242
FAIL: Provided ECDH premaster secret is not correct
ECDH - Profit?
Well, let’s give it a shot with our premaster secret!


Crypto Bad Nonce
Our last challenge on the Phospholipid addon! The crypto_bad_nonce starts with a nice little narrative on what we are trying to accomplish.
The flag was encrypted with the following order of ATECC608B commands:
1. Nonce: A bad nonce was generated to "initialize TempKey to a specified value".
2. Write: Data slot #8 block #0 was written with a certain value.
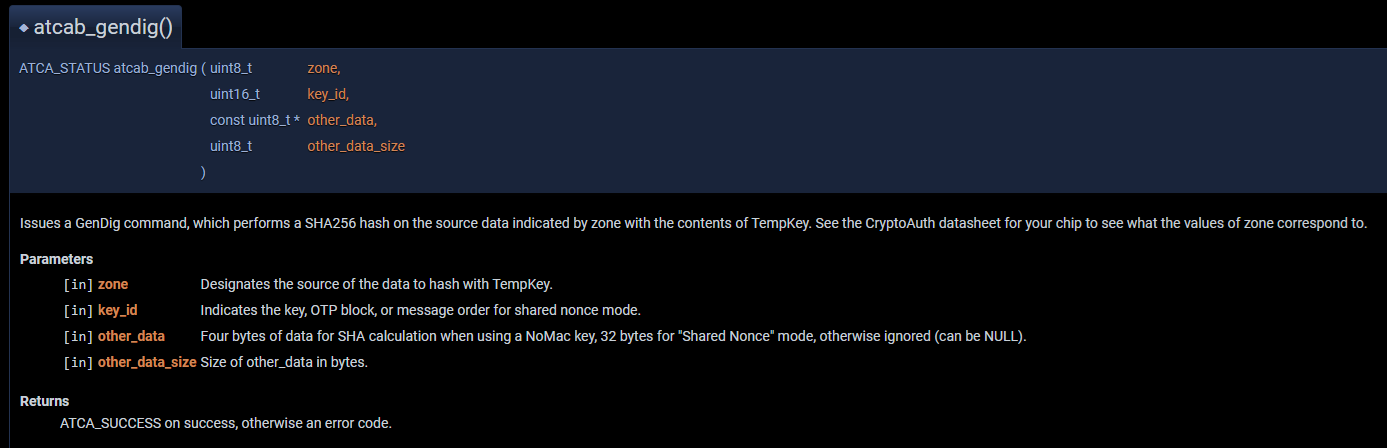
3. GenDig: Data slot #8 was used as GENDIG_ZONE_DATA to "performs a SHA256 hash on the source data indicated by zone with the contents of TempKey".
4. AES: The encrypted flag cipher was generated with the AES algorithm using the value of TempKey after the execution of the previous steps.
bad nonce value used:
42424242424242424242424242424242
42424242424242424242424242424242
value that was written to data slot #8 block #0:
004265207374726F6E6720616E642072
65616420646174617368656574732061
resulting encrypted flag cipher: 40878CBD30C22E590EFB1C9448A3B3AA
Can you reproduce and decrypt the cipher?Key Generation
There are quite a few hints throughout this blurb. It did seem suspicious that certain parts were quoted and sure enough after the CTF there was confirmation that this was intended. What is an interesting side-note however was that not all search engines were equal and a nice post-NSEC blog post goes into more details - I was at least one of the people mentioned where nothing showed up on Google search.
With that said, I was still able to find the relevant documentation with a bit of sleuthing and the hints lead us to the Microchip CryptoAuthentication Library documentation. Specifically to start:
In the same documentation we were able to find the GenDig documentation as well.
At this point we understand a bit more of what is going on, but it isn’t really enough to start putting all the pieces together. I kept sleuthing around, and was jumping through the code references I could find.
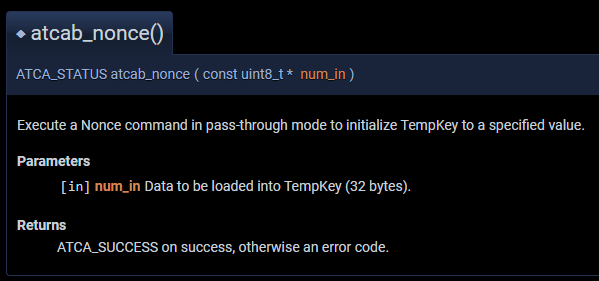
Looking at the source repo I was able to find the code for atcab_nonce.
/** \brief Execute a Nonce command in pass-through mode to initialize TempKey
 *         to a specified value.
 *
 *  \param[in] num_in  Data to be loaded into TempKey (32 bytes).
 *
 *  \return ATCA_SUCCESS on success, otherwise an error code.
 */
And then similarly the code for atcab_gendig.
/** \brief Issues a GenDig command, which performs a SHA256 hash on the source data indicated by zone with the
 *  contents of TempKey.  See the CryptoAuth datasheet for your chip to see what the values of zone
 *  correspond to.
 *  \param[in] device           Device context pointer
 *  \param[in] zone             Designates the source of the data to hash with TempKey.
 *  \param[in] key_id           Indicates the key, OTP block, or message order for shared nonce mode.
 *  \param[in] other_data       Four bytes of data for SHA calculation when using a NoMac key, 32 bytes for
 *                              "Shared Nonce" mode, otherwise ignored (can be NULL).
 *  \param[in] other_data_size  Size of other_data in bytes.
 *  \return ATCA_SUCCESS on success, otherwise an error code.
 */
While I was able to get some further details, like ATCA_GENDIG and GENDIG_ZONE_DATA definitions, it wasn’t until I came across the ATECC608-Tools repo that things really started coming together. Specifically the read_encrypted.sh file is where the initial GenDig logic was laid out for me.
############################################
# Update Tempkey using slot data
############################################
opcode=15
param1=02
param2=$(printf "%02x00" $keyslot)
zeros=00000000000000000000000000000000000000000000000000
tempkey_msg=$key$opcode$param1$param2$sn8$sn01$zeros$tempkey
tempkey=$(echo $tempkey_msg | xxd -r -p | sha256sum | cut -d ' ' -f 1)
Ok, let’s start putting what we know together and see if we can come up with the proper key. We can pull the serial of the chip from the console easy enough. Similarly, we know we are loading TEMPKEY with a known value, so it simplifies our approach. I put everything together in a small script:
#!/bin/bash

# Serial number breakdown
sn="01239C45FA2E0650EE"
sn01=${sn:0:4}
sn23=${sn:4:4}
sn47=${sn:8:8}
sn8=${sn:16:2}

############################################
# atcab_nonce - Set initial local TempKey
############################################
tempkey="4242424242424242424242424242424242424242424242424242424242424242"
echo "atcab_nonce - Tempkey is $tempkey"

############################################
# atcab_gendig - Update Tempkey using slot
############################################
key="004265207374726F6E6720616E64207265616420646174617368656574732061" #Data from slot 8
keyslot="8"
param2=$(printf "%02x00" $keyslot) #KeyID - little endian which is 0800
opcode="15" #ATCA_GENDIG = 15
param1="02" #GENDIG_ZONE_DATA = 02
zeros="00000000000000000000000000000000000000000000000000" #Why is this here?
tempkey_msg=$key$opcode$param1$param2$sn8$sn01$zeros$tempkey #Not entirely sure?
tempkey=$(echo $tempkey_msg | xxd -r -p | sha256sum | cut -d ' ' -f 1)

echo "atcab_gendig - Tempkey is now $tempkey"
Which gives us:
└─$ ./auto.sh
atcab_nonce - Tempkey is 4242424242424242424242424242424242424242424242424242424242424242
atcab_gendig - Tempkey is now 4174b92e1b6d317f3bb4a648cc95345619d6d4d4a48c4b9e61861c162675f3f6
Disclaimer: this is where I finished at the end of the CTF. I ended up getting the right key after all it seems, but I was convinced I had messed something up in the key generation, not in the decryption portion. It wasn’t until several days after the CTF closed, a lot more research, and a sanity check from Roujo that my mistake was realized. It is frustrating, but at the same time validating that I had actually gotten the logic correct, and doubles as a “check every part of your work” reminder.

Ciphertext Decrypt
Now that I know my key is actually correct, time to finish off the challenge, and subsequently the entire Phospholipid track. Looking back at where I went wrong, I think I was focusing too much on trying to use openssl as that is what I leveraged during the ECDH portion. Either way, with a slight pivot in thinking, and a renewed sense of sanity, I took a different approach to see if it would go better.
from Crypto.Cipher import AES
import binascii

# Provided key and ciphertext (hex encoded)
# Truncate key to 16 bytes
key_hex = '4174b92e1b6d317f3bb4a648cc953456'
ciphertext_hex = '40878CBD30C22E590EFB1C9448A3B3AA'

# Convert hex to bytes
key = binascii.unhexlify(key_hex)
ciphertext = binascii.unhexlify(ciphertext_hex)

# Create AES cipher in ECB mode
cipher = AES.new(key, AES.MODE_ECB)

# Decrypt the ciphertext
plaintext = cipher.decrypt(ciphertext)

# Decode the plaintext to a readable string if necessary
try:
    plaintext_str = plaintext.decode()
except UnicodeDecodeError:
    plaintext_str = plaintext

print("Decrypted plaintext:", plaintext_str)
With a hope and prayer I kicked it off…

And with that we have successfully completed the Phospholipid track. Wow, what a journey.
Summary
As always, this year’s NSEC CTF was a smashing success as far as I’m concerned. The leaning in to the hardware tracks, from the multiple badge tracks, RF, and other physical-based challenges, was very welcomed. I ended up learning a ridiculous amount about how to work with hardware, and at the end of the day this is exactly what I am looking for.
Follow-up next steps
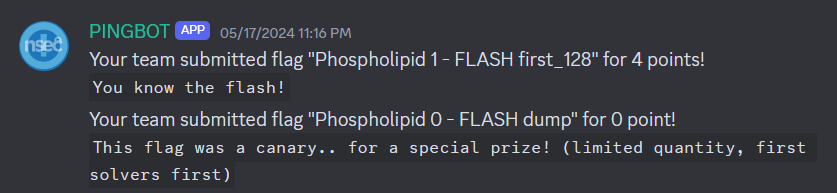
For those who pay attention to detail, you may remember that there was an interesting message when submitting the Flash Dump Canary flag:
Your team submitted flag “Phospholipid 0 - FLASH dump” for 0 point! This flag was a canary.. for a special prize! (limited quantity, first solvers first)
What was this all about? Well Sunday morning during the CTF our table had a nice drive-by drop off!

So what I’m seeing is I’ll be able to build my own Phospholipid? Hell yeah! I’m going to leave this for a future exercise once I’ve had a bit of rest and I plan on looking through the source code once released, but this will be an excellent post-CTF continuation.
Commentary
At the end of the CTF when I approached Jonathan Marcil to discuss a few things and I mentioned that this writeup would be happening he explicitly asked me to be critical. I will double down and say that I mostly have to struggle to find things to criticize! The evolution of the track itself I thought was well done. All the pieces build on each other, and the custom datasheet was fantastic as far as information to get things kicked off even if you had no idea where to start.
The Google search element was a small detraction sure enough, but not enough to completely derail me during the CTF. A few stubborn searches later and I did end up in the right place. I think if the explicit use of quotes was meant to be a quick pivot to the documentation then it might not have gone to plan, but these slight detractions are also part experiencing a CTF.
Lastly, the DIY pack for those who went down the rabbit hole was a fantastic motivator to continue learning well after the CTF itself. All I can say is chef’s kiss.
I’m already looking forward to next year and I am hoping to see even more hardware-based challenges. Here’s to the next several months’ worth of practicing to be ready!
Thanks folks, until next time!
COMMENTS
You can use your Mastodon or other ActivityPub account to comment on this article by replying to the associated post.