
Introduction & Recap
Recently I had an opportunity to participate in the Montrehack event covering the NSEC 2024’s Cryptographic co-processor badge addon. This was a mentored session format going over the CTF challenges and offering an opportunity for those who weren’t able to participate at NSEC. Jonathan Marcil reached out and aked if I would be interested in helping out and I was overjoyed to say yes. The event itself was fantastic, and I was happy to see more people “get it” as I did during the CTF. Here’s to many more events, more hardware, and more challenges to come!
But now it’s time to go further! In my last post I showed the CTF Addon DIY Kit that was shared out to teams who successfully dumped the flash of the addon during NSEC. Reinvigorated from the Montrehack event it’s time to go through and build my own phospholipid. Over the last few years, between the Horse, the PAD, the Tie, and other hardware devices at NSEC I’ve managed to build up a small amount of knowledge in how to reverse and debug ESP32 chips and code, however until now, I have had very limited exposure to building that same hardware, and I was quite excited for the opportunity.
Parts & Schematics
Ok where to start? We have the DIY kit, and the schematic. So let’s think this out.
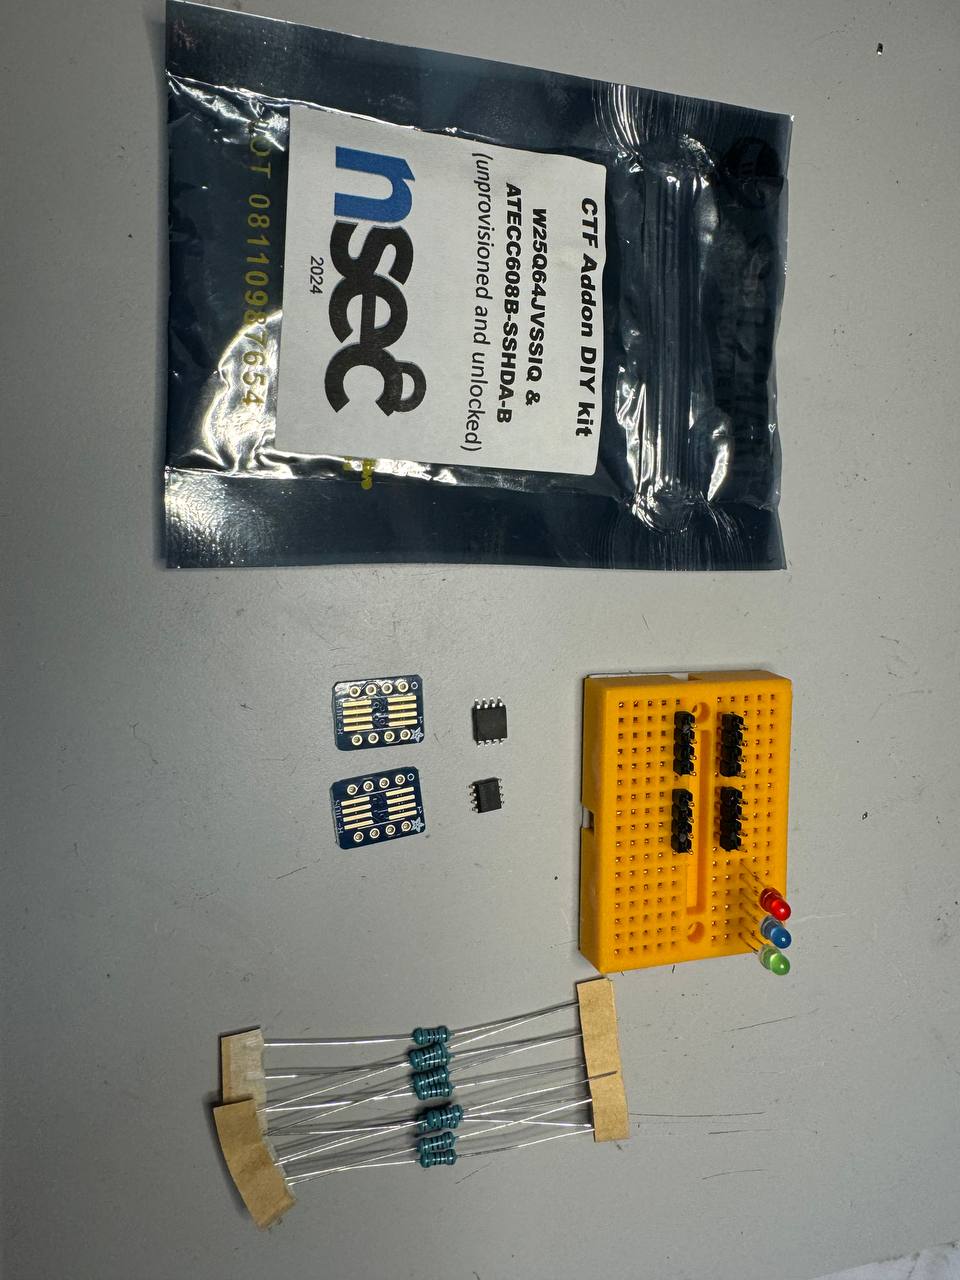
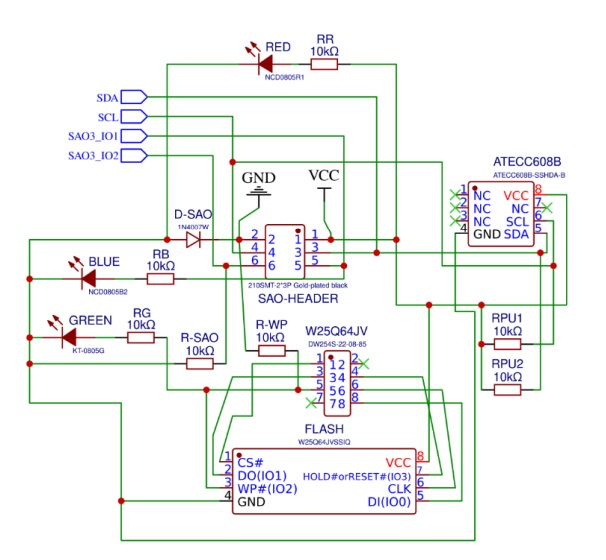
There are essentially three “main” components I am thinking through. First, the actual NSEC badge. I have that handy, with the addon firmware already on it. Secondly, the W25Q64JV flash memory part of the DIY Kit. That came unprovisioned, however I have flash dumps from NSEC handy, so could in theory “provision” it rather easily. Lastly, the ATECC608B cryptographic co-processor. Here is where the main challenge will be as I don’t have an easy way to provision that.
I figured one step at a time however, since the first two challenges of the track include working with flash memory and, mostly, not the ATECC608B. So let’s work on getting everything setup on the breadboard, get our dumped flash written, and verify we have a initial working base before moving to the more complicated part.
Soldering & Validation
We have a small amount of soldering to do right at the start. Both the flash memory and ATECC608B need to be attached to the provided breakout boards. This allows us to attach the chips on a breadboard and prototype without permanently affixing the chips.
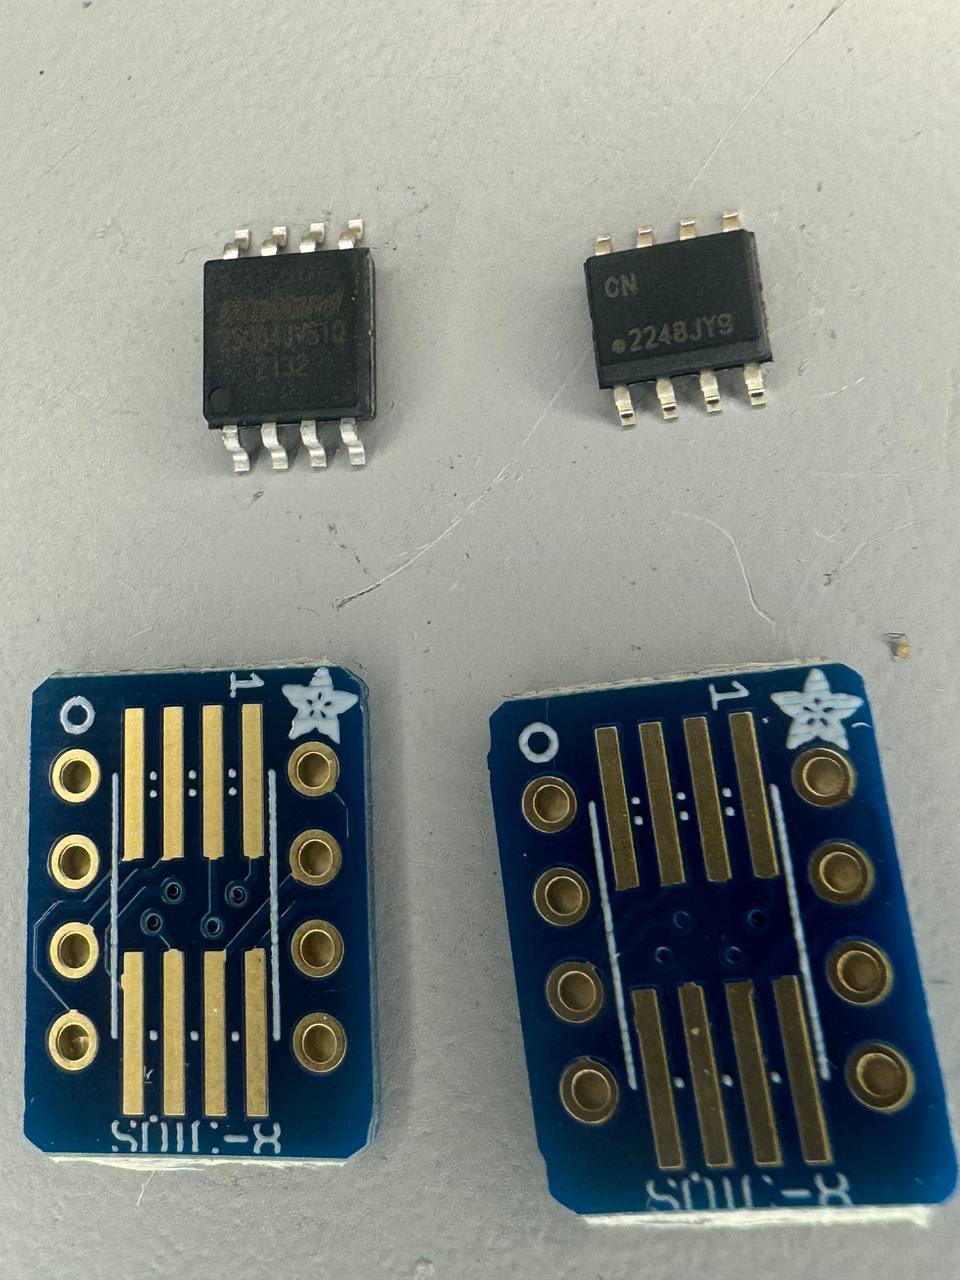
With a bit of flux, and a slightly messy solder job (to be fair I cleaned the flux residue off after this picture), both are now ready to be used.

I wanted to test the W25Q64JV flash before putting together the full addon on the breadboard. I decided to use the same setup In used during NSEC, hooking up the chip to a Flipper Zero, with a minimal circuit, to ensure that things are working as expected. The part that took me longer to figure out was which breakout pin corresponded to which SOIC pin. You’d think it would be obvious but since the chip pins and breakout pins were 90 degrees from one another, it took me a bit of time to figure out the breakout board starts top left with pin 1 and moves counter clockwise to 8. Part of not having worked with this before and I’m glad I struggled as it forced me to read, and ultimately learn, more.
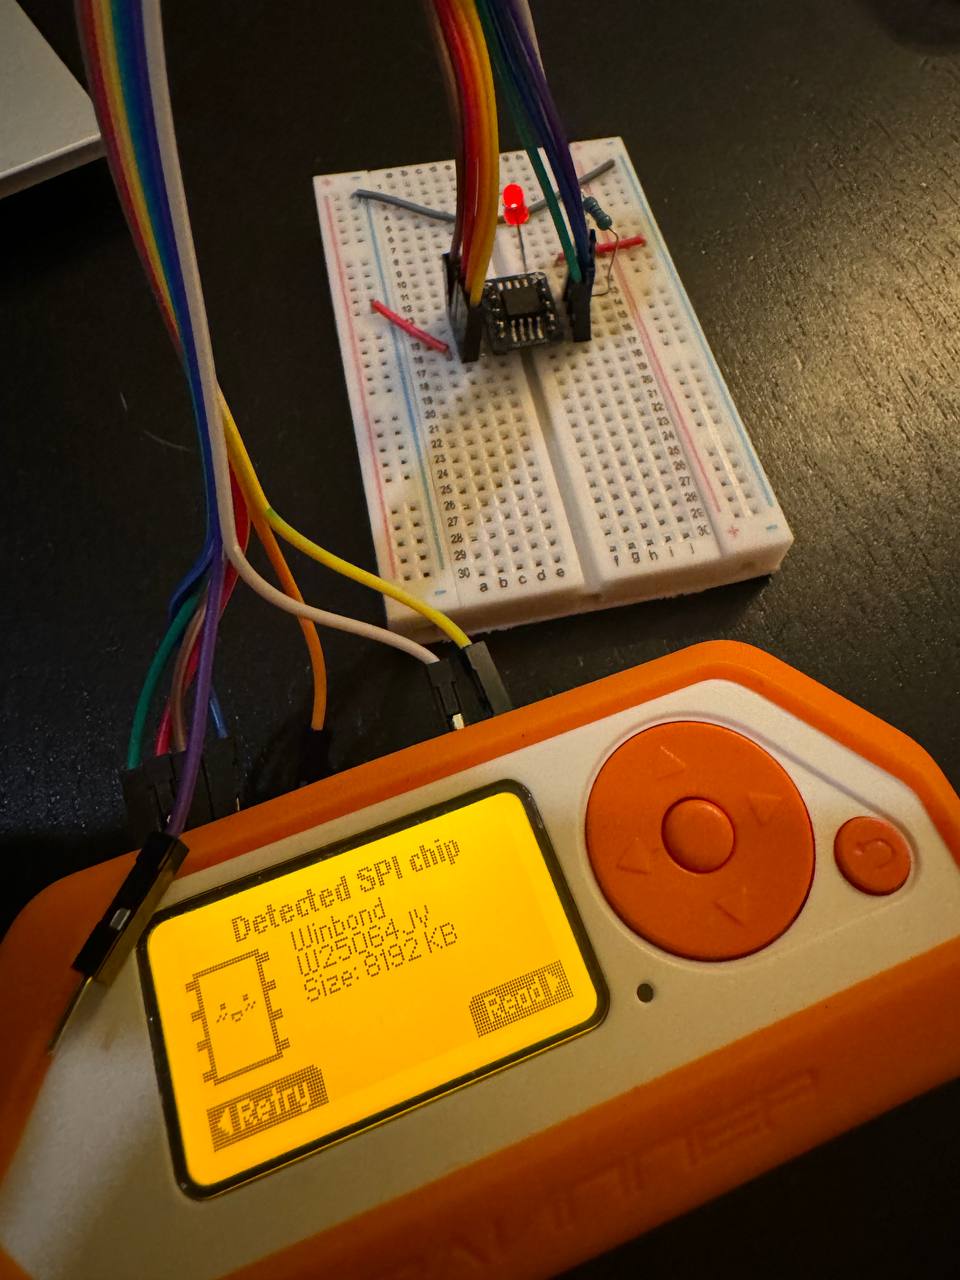
Alright so far so good. Let’s build from here and put together the full addon.
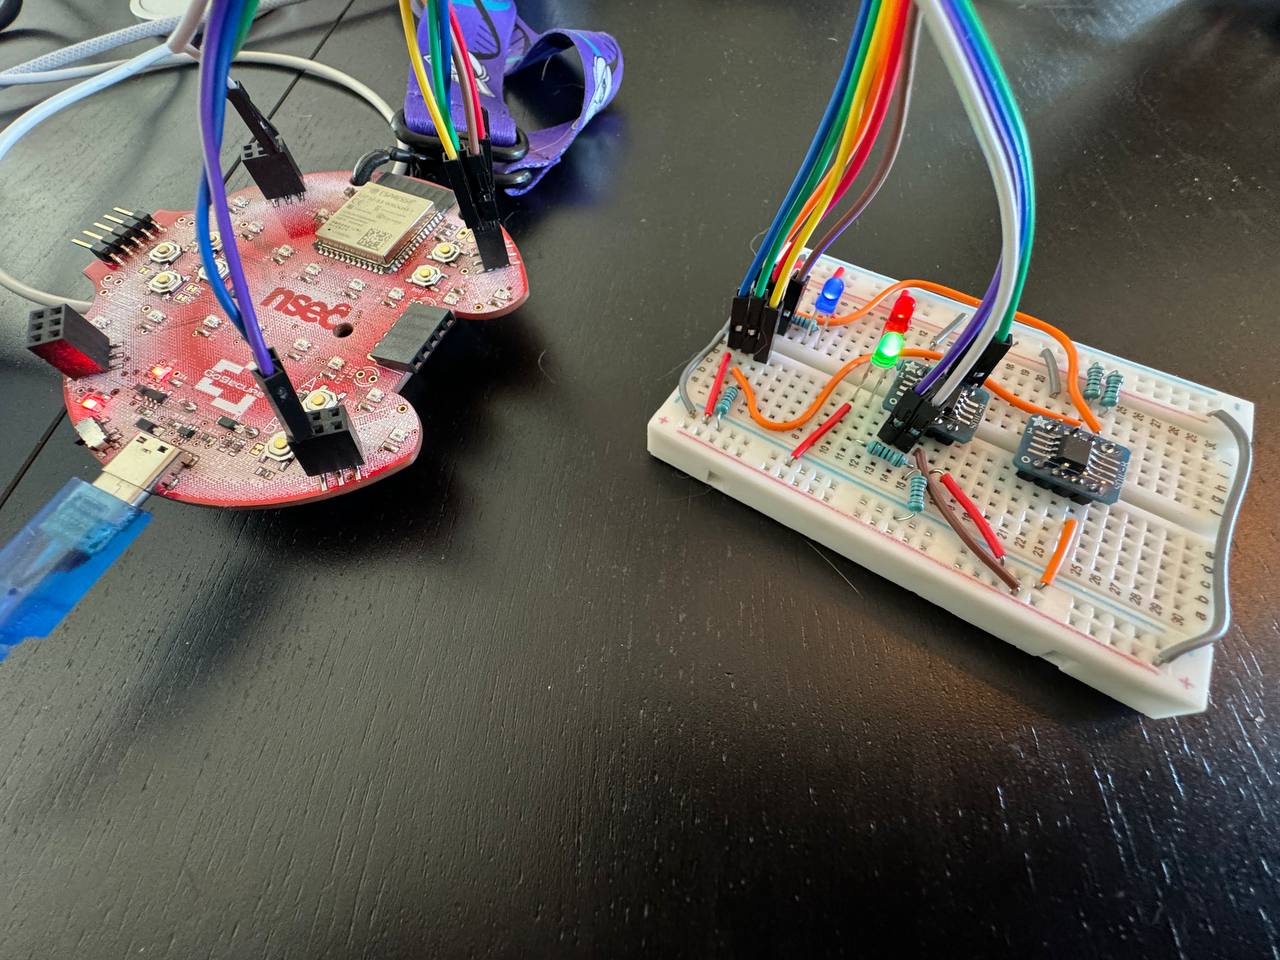
Breadboard Build
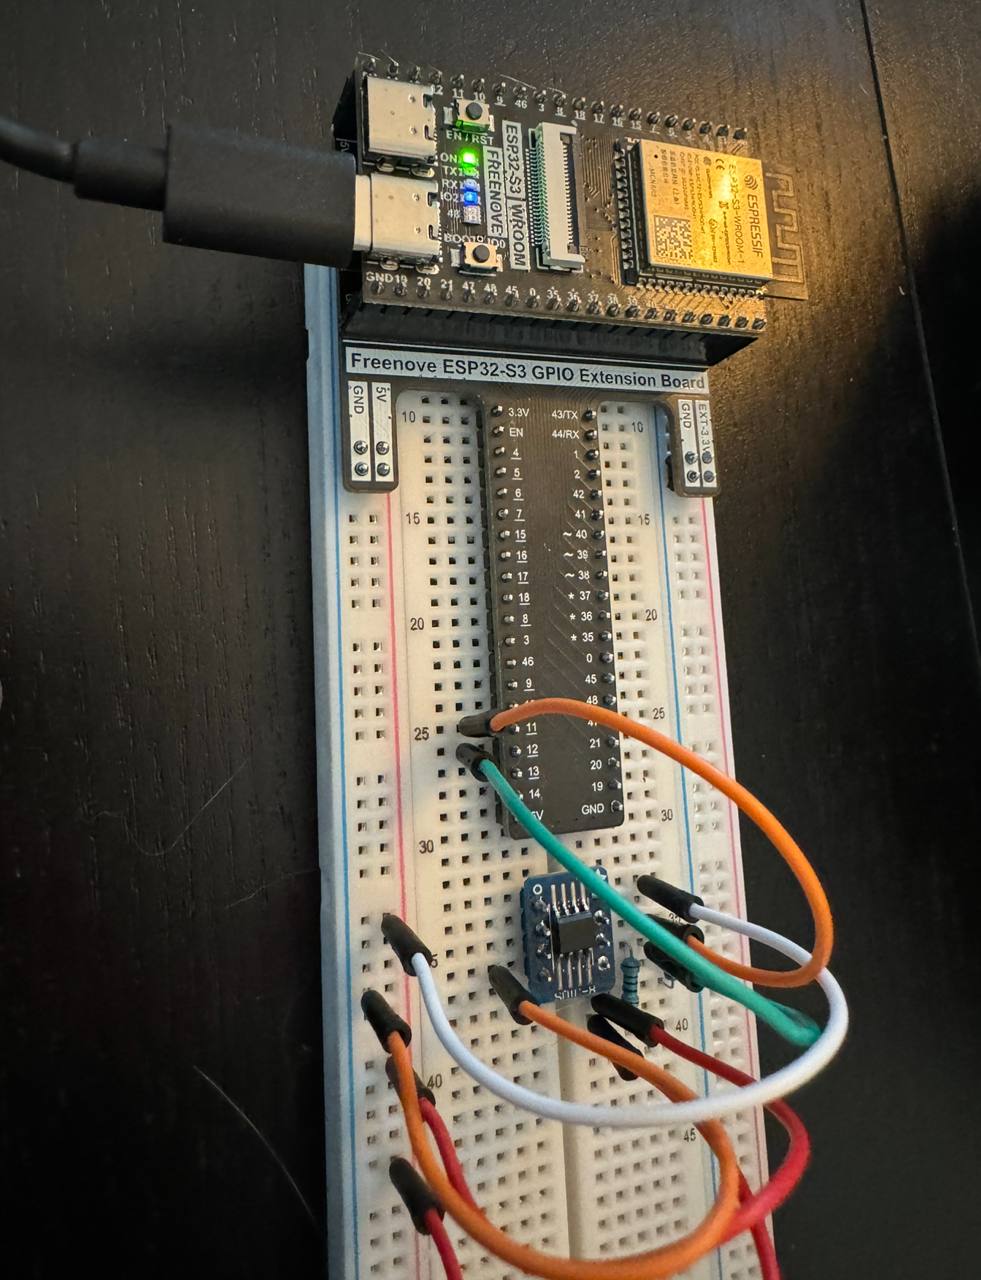
I honestly think this was my favorite part of the build. Getting the connections in place was straightforward, but you could also delve into the realm of art. I spent a bit of time mentally modelling how to put it together on the breadboard. There are essentially three main sections, the flash, the crypto co-processor, and the SAO connectors. Technically, since this is on the breadboard, the SAO connectors are just wires that will go from the breadboard to the ESP32 badge. I tried to design it in a way that would result in the least amount of overlapping wires as possible. This wasn’t a hard requirement, but I figured if I’m going to do this might as well try and keep it clean.
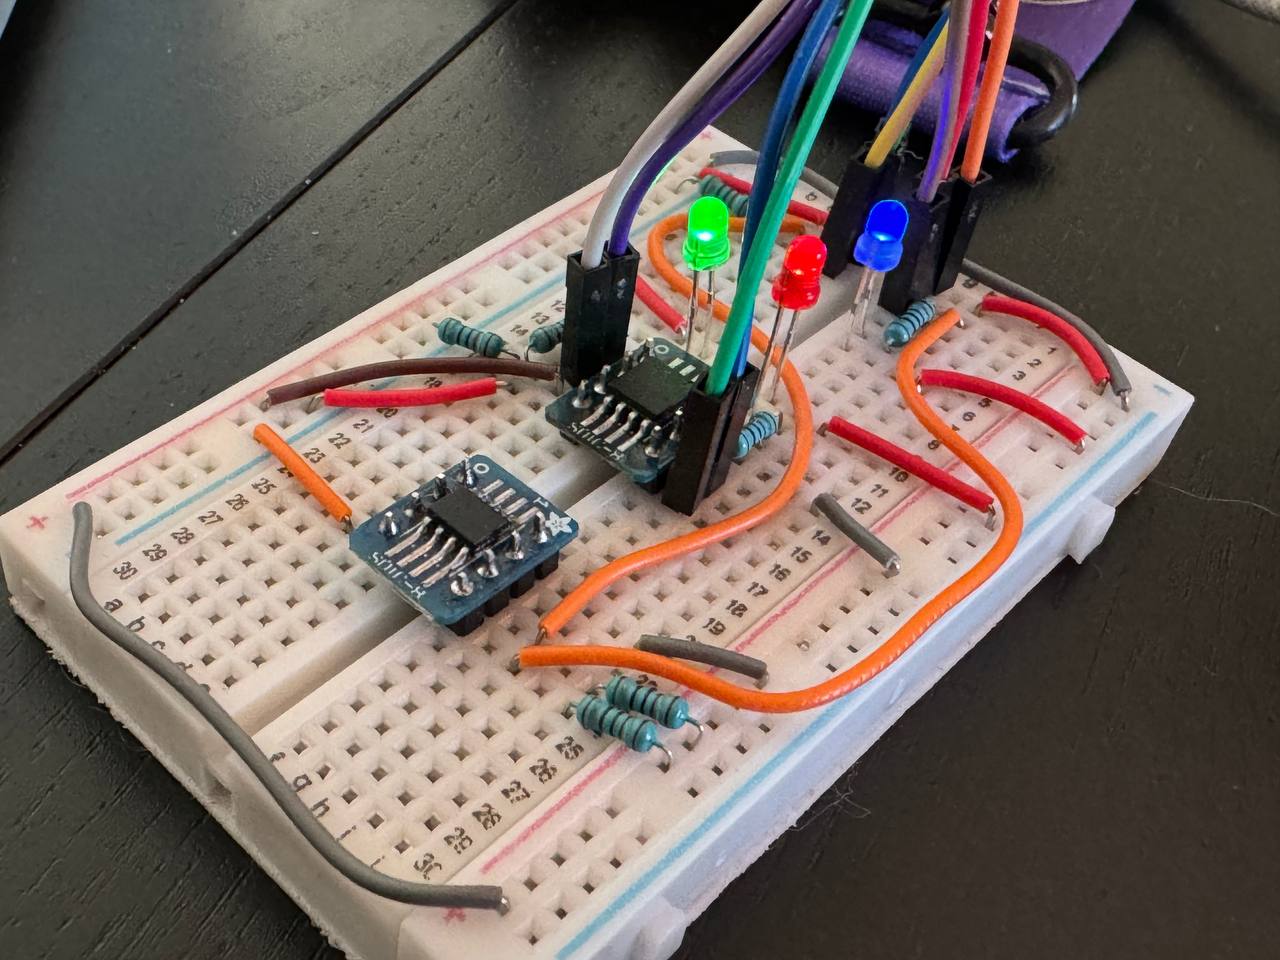
Bonus points if you noticed the brown cable and identified that I bridge the Write Protect pin of the W25Q64JV to VCC to pull it up.
Firmware Flashing
Alright great, let’s get the W25Q64JV provisioned. This was a bit of a cheat, but I already had the dump and could easily connect to the chip, so let’s use the same process and write to it.
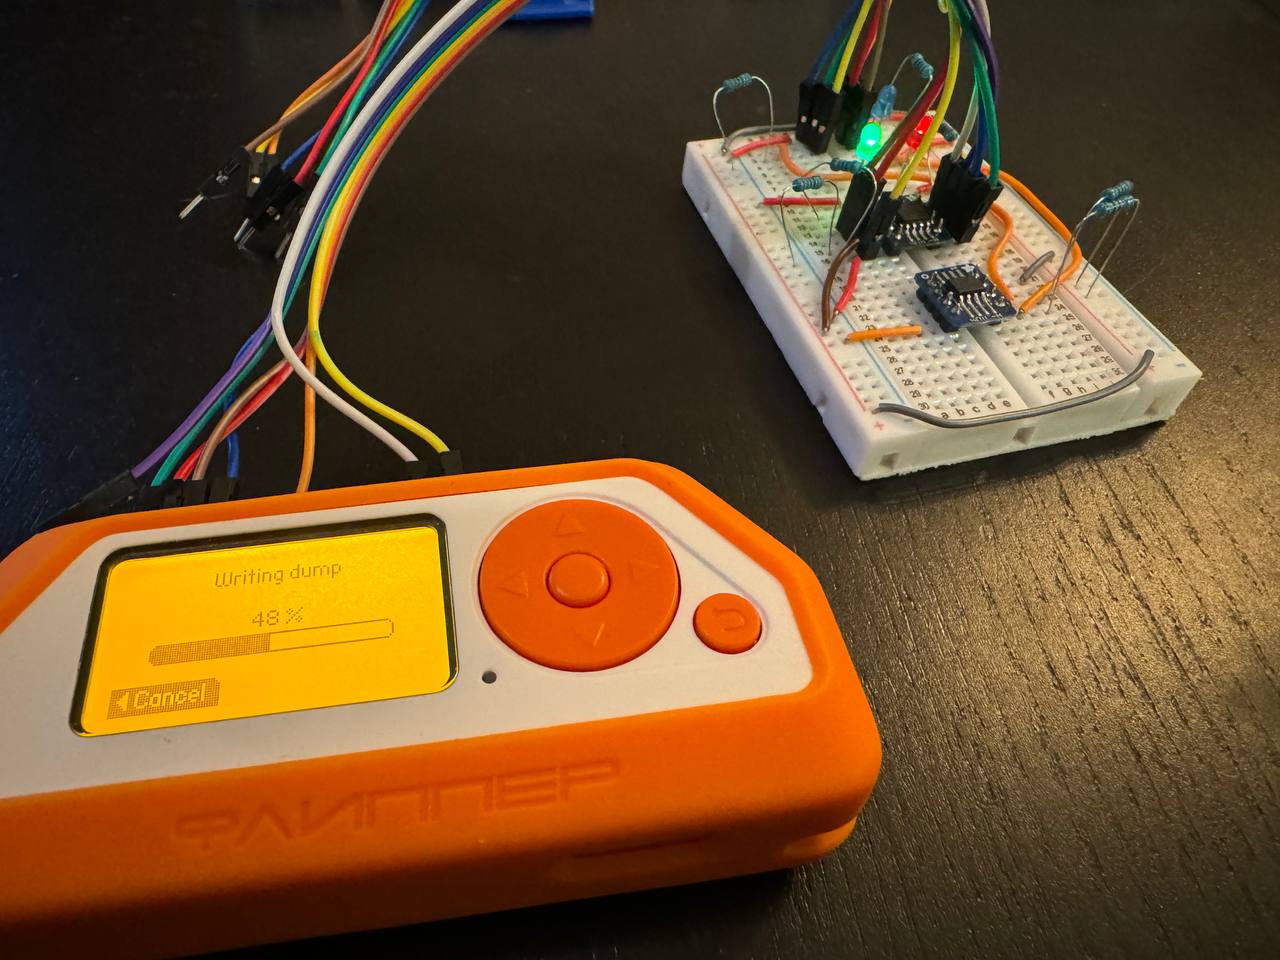
That seemed to work. Time for the first real test though - let’s connect the SAO wires from our addon to the NSEC badge and see if we can work with it.
Disclaimer - the savvy reader may question the
LOCK_ZONE_CONFIG Lockedabove. This was taken after I initially provisioned, but didn’t lock, the ATECC608B. I forgot to take a screenshot with details at that step, but the same errors are seen pre-crypto provisioning.
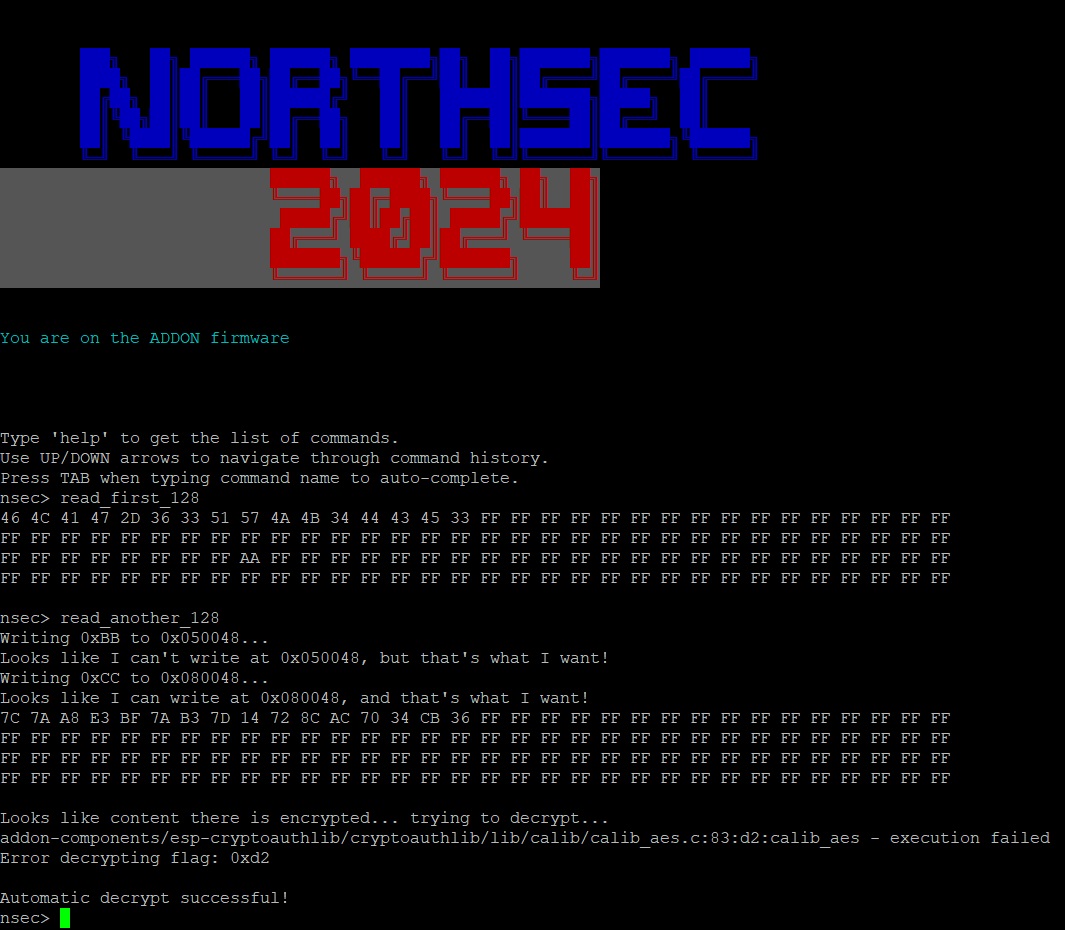
Awesome! Now the read test. Let’s update the registers in raw mode and try to read the first 128 how we did as part of the CTF.
1
2
3
4
nsec> raw_read_registers
Status Register-1 : 0x2c
Status Register-2 : 0x02
Status Register-3 : 0x60
That is fantastic. We expect the cryptographic operations to fail at the moment, but our custom-built addon is connected, interactable, and we just confirmed the registers and flash work as expected. With this working base, we can move on to the next part - provisioning the ATECC608B.
Cryptographic Provisioning
This part of provisioning was quite a challenge. While the actual badge firmware code was released, the ATECC608B provisioning code was not public at the time of writing. I reached out to Jonathan Marcil and discussed my interest in recreating the addon. He graciously sent me the code he used and that is what I’ll be going over in this section. Even with the code, it was not straightforward as I ended up using an ESP32S3 chip, not the ESP32-Wroom, to provision the chip, which introduced its own challenges to adjust.
Customizing Source Code
Let’s start with the custom README details.
1
2
3
4
5
6
7
8
9
# ctf-addon-prov
esp32-wroom firmware to provision the CTF addon. fits under 1MB.

> [!WARNING]
> This does irreversible changes to the ATECC608A chip when connected to SDA/SDL. You've been warned.

This is based out of a firmware branch of [ESP-CRYPTOAUTHLIB](https://github.com/espressif/esp-cryptoauthlib/tree/feature/add_firmware_source_code). They also provide a a python script helper that we're getting from the upstream/master. See section bellow for their README.

And created & tested for ATECC608B-TCSM which is the CUSTOM variant. Its datasheet is under NDA but the [508 is the same](https://cdn.sparkfun.com/assets/learn_tutorials/1/0/0/3/Microchip_ATECC508A_Datasheet.pdf). The [datasheet for ATECC608B-TFLXTLS](https://ww1.microchip.com/downloads/aemDocuments/documents/SCBU/ProductDocuments/DataSheets/ATECC608B-TFLXTLS-CryptoAuthentication-Data-DS40002249.pdf) is also handy for the Slot Configuration Summary.
The README continues with essentially three steps. The first is to build the ESP32 variant firmware. This is the base that will allow us to work with the ATECC608B.
1
2
3
4
5
6
## build
From ESP-IDF 5.1, `cd esp_cryptoauth_utility/firmware`.

Build & load the firmware `idf.py build flash monitor`. You can try `help` to check if you see `nsec_prov` (don't run it!). The firmware won't do anything unless you call `init 21 22` (SDA=21 SDL=22) which might lock some things on the original firmware but not on the NSEC version.

Exit the monitor before you mess everything up (speaking from experience).
The second step is to provision the ATECC608B.
1
2
3
4
5
6
7
8
9
10
11
12
13
14
15
16
17
## provision
With the firmware loaded and the SDA and SDL connected to PIN 21 and 22:

`cd esp_cryptoauth_utility`

> [!WARNING]
> This does permanent irreversible changes to the ATECC608A chip

`python secure_cert_mfg.py --nsec --nsec_lock --target_chip esp32 --signer-cert signercert.pem --signer-cert-private-key signerkey.pem --port COM4`

When you see `Wait for init` press the RESET button on the ESP32.

This will output the "Device cert" to STDIN and also save it under /output_files/ with the serial number in the file name.

If you see a bunch of `secure_element: Status: Success` it's good. SUCCESS!!!

At this point if you run this two times, you'll erase the old device cert.
Since the provision has a step that will irreversibly lock the ATECC608B, there is also a test section that allows us to provision without locking the Data Zone. Considering I only have chip and haven’t gone through provisioning before, I will definitely be leveraging this section.
1
2
3
4
5
6
7
8
9
## testing

To only provision and lock the config zone and leave the data zone unlocked, remove `--nsec_lock`:
`python secure_cert_mfg.py --nsec --target_chip esp32 --signer-cert signercert.pem --signer-cert-private-key signerkey.pem --port COM4`
Some keys will still be writable, as the slot config write_config set to 0 will allow it.

If you locked the config but not the data, nsec_prov will bug out and the script will skip nsec_lock_data and the generic provision_trustcustom_device. So if you want to generate device specific certs, like the original firmware, you can run the command without any nsec parameters:
`python secure_cert_mfg.py --target_chip esp32 --signer-cert signercert.pem --signer-cert-private-key signerkey.pem --port COM9`
Since the original code was modified to not lock the chip, this is fine to run.
ESP IDF Build
There were a few different things I had to do to be able to build the ESP32 firmware. Firstly, I needed to setup the toolset. I ended up going with the VSCode extension as it simplified the install process for me. I did end up installing ESP IDF 5.3, which is different than the 5.1 referenced in the documentation. Thankfully, this ended up not being materially different for the project. With the extension installed I had few defaults to update, like setting the Espressif Target to esp32s3 (the devkit I was using).
With all the configurations in place, or so I thought at the time, I tried to build the firmware.
1
2
3
4
ctf-addon-prov-main/cryptoauthlib/lib/mbedtls/atca_mbedtls_wrap.c:882:10: fatal error: mbedtls/pk_internal.h: No such file or directory
  882 | #include "mbedtls/pk_internal.h"
      |          ^~~~~~~~~~~~~~~~~~~~~~~
compilation terminated.
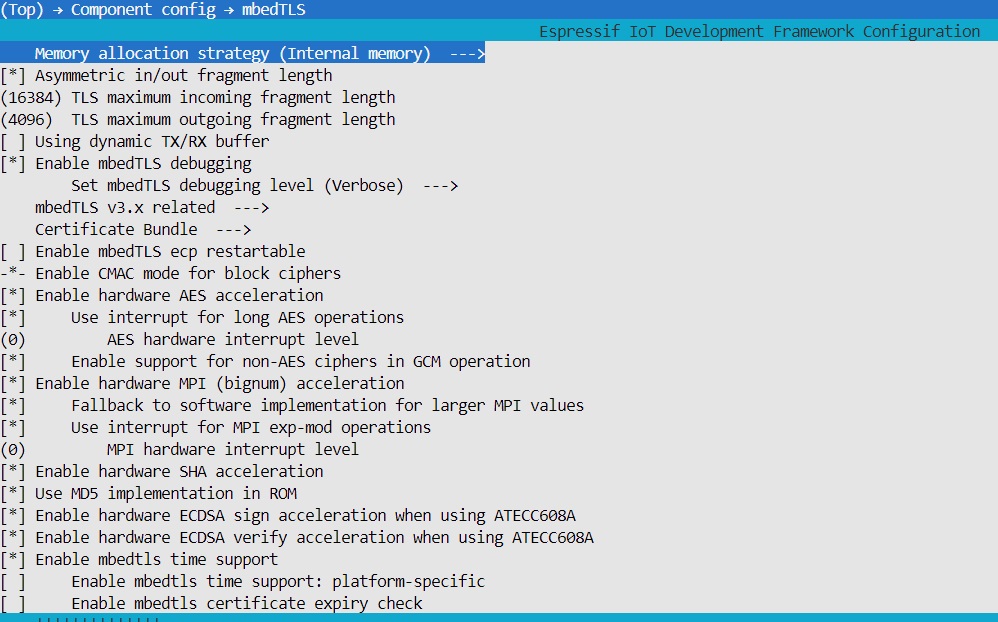
Well that wasn’t ideal. With a lot of research, discussions, and reading Espressif documentation, I realized that the issue was that I hadn’t setup the mbedtls option using IDF’s menuconfig. The problem was that the code I was sent wasn’t an ESP IDF project as-is, in other words it did not have an existing sdkconfig file. Trying to import the code/folder into a new IDF project also wasn’t working. I ended up creating a brand new ESP IDF project, taking the default sdkconfig that was generated, and copying it back into the addon code base. To my utmost surprise, this actually worked! I was able to run idf.py menuconfig at this point and set the required mbedtls options.
All that was left was giving the build and flash another shot.
1
2
3
4
5
6
7
8
9
10
11
12
13
14
15
16
17
18
19
20
21
22
23
24
25
26
27
28
29
30
31
32
33
34
35
36
37
38
39
40
41
42
43
44
45
46
47
48
49
50
51
52
53
54
55
56
57
58
59
60
61
62
63
64
65
66
67
68
69
70
71
72
73
74
75
76
77
78
79
80
81
82
83
84
85
86
87
88
89
90
91
92
93
94
95
96
97
98
99
100
101
102
103
104
105
106
107
108
109
110
111
112
113
114
115
116
117
118
119
120
121
122
123
124
125
126
127
128
129
130
131
132
133
134
135
136
137
138
139
140
141
142
143
144
145
146
147
148
149
150
151
152
153
154
155
156
157
158
159
160
161
162
163
164
165
166
167
168
169
170
171
172
173
174
175
176
177
178
179
180
181
182
183
184
185
186
187
188
189
190
191
192
193
194
195
196
197
198
199
200
201
202
203
204
205
206
207
208
209
idf.py build flash monitor
Executing action: all (aliases: build)
Running ninja in directory
...
Bootloader binary size 0x5260 bytes. 0x2da0 bytes (36%) free.
Executing action: flash
Serial port COM6
Connecting....
Detecting chip type... ESP32-S3
Running ninja in directory
...
Executing "ninja flash"...
[1/5] cmd.exe /C "cd /D .../esp_cryptoauth_utility/firmware/build/ecu_firmware.bin
ecu_firmware.bin binary size 0x542a0 bytes. Smallest app partition is 0x100000 bytes. 0xabd60 bytes (67%) free.
[1/1] cmd.exe /C "cd /D .../esp_cryptoauth_utility/firmware/build/bootloader/bootloader.bin
Bootloader binary size 0x5260 bytes. 0x2da0 bytes (36%) free.
[2/3] cmd.exe /C "cd /D ...\esp\v5.3\esp-idf\components\esptool_py && C:.../bootloader.bin 0x10000 ecu_firmware.bin 0x8000 partition_table/partition-table.bi
esptool.py v4.8.dev5
Serial port COM6
Connecting....
Chip is ESP32-S3 (QFN56) (revision v0.2)
Features: WiFi, BLE, Embedded PSRAM 8MB (AP_3v3)
Crystal is 40MHz
MAC: 48:27:e2:e9:15:84
Uploading stub...
Running stub...
Stub running...
Changing baud rate to 460800
Changed.
Configuring flash size...
Flash will be erased from 0x00000000 to 0x00005fff...
Flash will be erased from 0x00010000 to 0x00064fff...
Flash will be erased from 0x00008000 to 0x00008fff...
SHA digest in image updated
Compressed 21088 bytes to 13045...
Writing at 0x00000000... (100 %)
Wrote 21088 bytes (13045 compressed) at 0x00000000 in 0.5 seconds (effective 336.8 kbit/s)...
Hash of data verified.
Compressed 344736 bytes to 175954...
Writing at 0x00010000... (9 %)
Writing at 0x0001feaa... (18 %)
Writing at 0x00029db3... (27 %)
Writing at 0x0002fb1d... (36 %)
Writing at 0x00035fb3... (45 %)
Writing at 0x0003c8bf... (54 %)
Writing at 0x00042915... (63 %)
Writing at 0x00048c4b... (72 %)
Writing at 0x000506c8... (81 %)
Writing at 0x00058ef1... (90 %)
Writing at 0x0005f3bf... (100 %)
Wrote 344736 bytes (175954 compressed) at 0x00010000 in 4.1 seconds (effective 665.2 kbit/s)...
Hash of data verified.
Compressed 3072 bytes to 103...
Writing at 0x00008000... (100 %)
Wrote 3072 bytes (103 compressed) at 0x00008000 in 0.0 seconds (effective 696.5 kbit/s)...
Hash of data verified.

Leaving...
Hard resetting via RTS pin...
Executing action: monitor
Running idf_monitor in directory ...\esp_cryptoauth_utility\firmware
Executing "python.exe ...\esp\v5.3\esp-idf\tools/idf_monitor.py -p COM6 -b 115200 --toolchain-prefix xtensa-esp32s3-elf- --target esp32s3 --revision 0 ...\esp_cryptoauth_utility\firmware\build\ecu_firmware.elf --force-color -m '...espressif\python_env\idf5.3_py3.11_env\Scripts\python.exe' '...\esp\v5.3\esp-idf\tools\idf.py'
--- WARNING: GDB cannot open serial ports accessed as COMx
--- Using \\.\COM6 instead...
--- esp-idf-monitor 1.4.0 on \\.\COM6 115200 ---
--- Quit: Ctrl+] | Menu: Ctrl+T | Help: Ctrl+T followed by Ctrl+H ---
ESP-ROM:esp32s3-20210327
Build:Mar 27 2021
rst:0x1 (POWERON),boot:0x2b (SPI_FAST_FLASH_BOOT)
SPIWP:0xee
mode:DIO, clock div:1
load:0x3fce2810,len:0x178c
load:0x403c8700,len:0x4
load:0x403c8704,len:0xcb8
load:0x403cb700,len:0x2db0
entry 0x403c8914
I (27) boot: ESP-IDF v5.3 2nd stage bootloader
I (27) boot: compile time Aug 30 2024 13:57:59
I (27) boot: Multicore bootloader
I (30) boot: chip revision: v0.2
I (34) boot.esp32s3: Boot SPI Speed : 80MHz
I (38) boot.esp32s3: SPI Mode       : DIO
I (43) boot.esp32s3: SPI Flash Size : 2MB
I (48) boot: Enabling RNG early entropy source...
I (53) boot: Partition Table:
I (57) boot: ## Label            Usage          Type ST Offset   Length
I (64) boot:  0 nvs              WiFi data        01 02 00009000 00006000
I (72) boot:  1 phy_init         RF data          01 01 0000f000 00001000
I (79) boot:  2 factory          factory app      00 00 00010000 00100000
I (87) boot: End of partition table
I (91) esp_image: segment 0: paddr=00010020 vaddr=3c030020 size=14c60h ( 85088) map
I (114) esp_image: segment 1: paddr=00024c88 vaddr=3fc93e00 size=02b0ch ( 11020) load
I (117) esp_image: segment 2: paddr=0002779c vaddr=40374000 size=0887ch ( 34940) load
I (128) esp_image: segment 3: paddr=00030020 vaddr=42000020 size=2cd48h (183624) map
I (162) esp_image: segment 4: paddr=0005cd70 vaddr=4037c87c size=0750ch ( 29964) load
I (175) boot: Loaded app from partition at offset 0x10000
I (175) boot: Disabling RNG early entropy source...
I (187) cpu_start: Multicore app
I (196) cpu_start: Pro cpu start user code
I (196) cpu_start: cpu freq: 160000000 Hz
I (196) app_init: Application information:
I (199) app_init: Project name:     ecu_firmware
I (204) app_init: App version:      1
I (209) app_init: Compile time:     Sep  1 2024 02:05:38
I (215) app_init: ELF file SHA256:  27ff6759d...
I (220) app_init: ESP-IDF:          v5.3
I (225) efuse_init: Min chip rev:     v0.0
I (229) efuse_init: Max chip rev:     v0.99
I (234) efuse_init: Chip rev:         v0.2
I (239) heap_init: Initializing. RAM available for dynamic allocation:
I (247) heap_init: At 3FC97FB8 len 00051758 (325 KiB): RAM
I (253) heap_init: At 3FCE9710 len 00005724 (21 KiB): RAM
I (259) heap_init: At 3FCF0000 len 00008000 (32 KiB): DRAM
I (265) heap_init: At 600FE100 len 00001EE8 (7 KiB): RTCRAM
I (272) spi_flash: detected chip: gd
I (275) spi_flash: flash io: dio
W (279) spi_flash: Detected size(8192k) larger than the size in the binary image header(2048k). Using the size in the binary image header.
W (292) i2c: This driver is an old driver, please migrate your application code to adapt `driver/i2c_master.h`
I (303) sleep: Configure to isolate all GPIO pins in sleep state
I (310) sleep: Enable automatic switching of GPIO sleep configuration
I (317) main_task: Started on CPU0
I (327) main_task: Calling app_main()
I (327) uart: queue free spaces: 32
Initialising Command line: >>
>I (327) main_task: Returned from app_main()

>>
help

help  [<string>]
  Print the summary of all registered commands if no arguments are given,
  otherwise print summary of given command.
      <string>  Name of command

init
  Initialize the ATECC chip on WROOM32SE  locks config, data zone if not locked
  already  Usage:init
Example:init

print-chip-info
  Print the Serial Number of the atecc608a chip  Serial number is a 9 byte
  number, unique to every chip  Usage:print-chip-info
Example:print-chip-info

generate-keys
  Generates an internal ECC private key inside the given slot of ATECC608
  returns its public key
  By default only slots 0,1,2 are supported  Usage: generate-keys <slot number>

Example:
generate-keys 0

generate-csr
  Generates a CSR from private key in specified slot.  Private key must be
  genereated at least once on specified slot for this command  to succeed.
  Information such as CN,O as well as the priv key slot etc. is picked
  from cert_def generated by python script.
  Usage:generate-csr
Example:
generate-csr

generate-pubkey
  Generates a public key from the present key-pair  generate-keys must be
  executed at least once on specified slot to succeed
  Usage:generate-pubkey <slot number>   Example:
generate-pubkey 0

provide-cert-def
  Provides the cert definition of device cert of signer cert to the atecc chip
  Usage:provide-cert-def 0 for device cert
  and provide cert def 1 for signer cert
Example:provide-cert-def 0(device)

program-dev-cert
  Sets the UART command handler to input the device certificate.

Usage:program-dev-cert lock

program-signer-cert
  Sets the UART command handler to input the signer certificate.

Usage:program-signer-cert lock

get-tngtls-root-cert
  get tngtls root cert, which already stored on the device  The ATECC608 device
  type should be TNG ( Trust & G0 )  Usage:get-tngtls-root-cert   Example:

get-tngtls-root-cert

get-tngtls-signer-cert
  get tngtls signer cert, which already stored on the device  The ATECC608
  device type should be TNG ( Trust & GO )  Usage:get-tngtls-signer-cert
  Example:
get-tngtls-signer-cert

get-tngtls-device-cert
  get tngtls device cert, which already stored on the device  The ATECC608
  device type should be TNG ( Trust & GO )  Usage:get-tngtls-device-cert
  Example:
get-tngtls-device-cert

nsec_prov
  provision the device automatically

nsec_config_and_lock
  config and lock the configuration

nsec_lock_data
  lock the data zone
Success! With the devkit firmware loaded, we can move on to attempting to provision the ATECC608B. Let’s keep it going.
ATECC608B Provisioning
Going back to the README sections above, we know we will be using secure_cert_mfg.py to actually trigger the provision. Unlike the example in the README however, we need to change it for our target platform, esp32s3, and the pins we connected our chip to, which ended up being 11 and 12. The provisioning command then became:
python secure_cert_mfg.py --port COM6 --nsec --target_chip esp32s3 --i2c-sda-pin 12 --i2c-scl-pin 11
I left the lock out initially as I wasn’t sure this would even work. It would have been a shame to get this far and then accidentally brick the chip, so I kept it safe for the initial provisioning.
So far so good, we see it connected to our provisioned pins and was able to identify the ATECC608B variant.
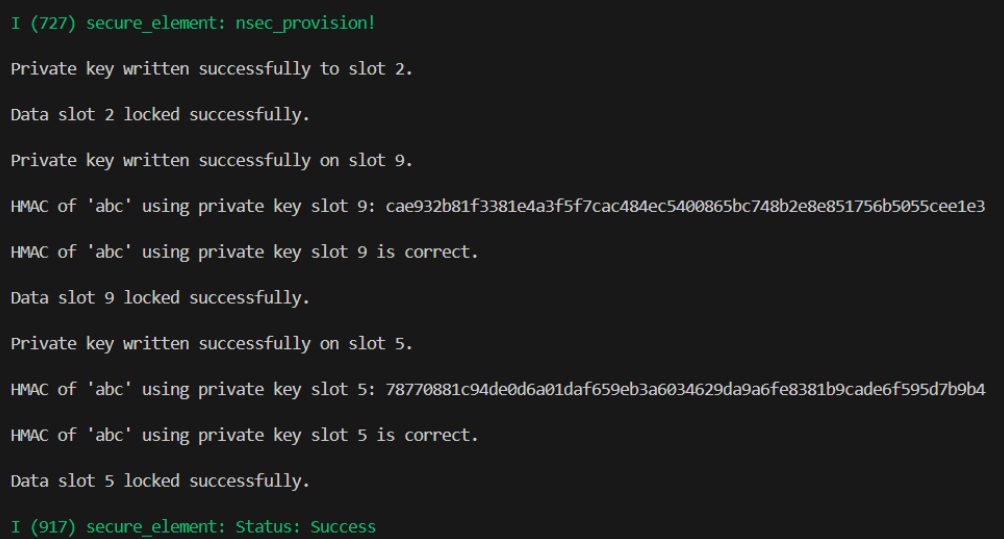
Which also looks good! Not only was it able to write the private keys at the right data slots, but the built in HMAC validation in the source code also looks good.
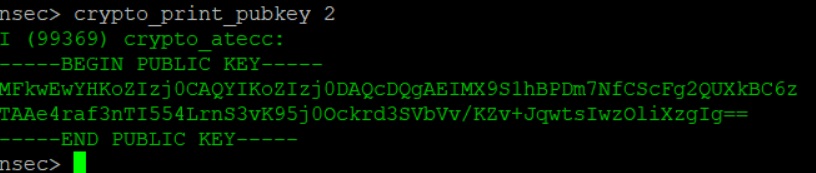
At this point I was excited and put the ATECC608B back into my breadboard addon and booted it up. While the decrypt functionality was not working properly, yet, I was able to verify that the public key was the same as what I saw during NSEC. I expected nothing less considering the built in provisioning validation, however it was nice to confirm with data I had gathered myself.
Locking Data Zone
It’s time for the finale - let’s lock down this chip and see if we can get our phospholipid clone completed. Going back yet again to the README, considering we already did a provision without a lock, we have the next steps to get it locked.
1
2
3
4
You can also just connect with `cd firmware, idf.py monitor` and call `init 21 22` to give those commands:
`nsec_config_and_lock` this is required to be able to run nsec_prov for some parts, some slots only works then config is locked
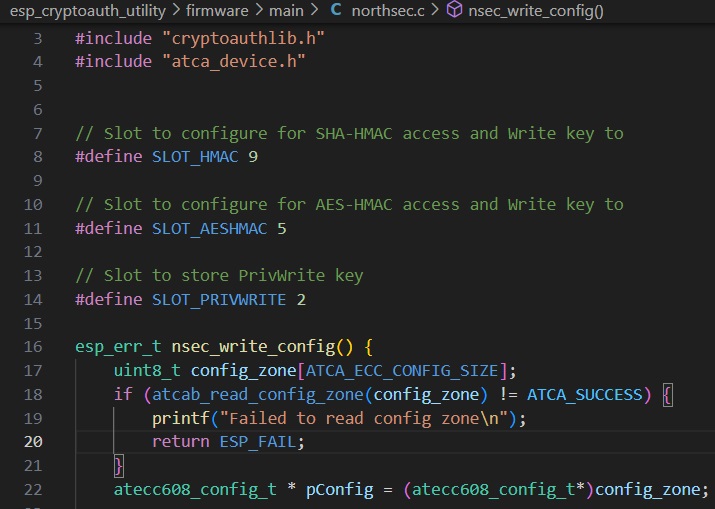
`nsec_prov` to write the global private key to slot 2 but won't write the hmac one to slot 9 if it's already written
`nsec_lock_data` to lock the data once and for good (this is useful when you have done testing and wants to make it like production)
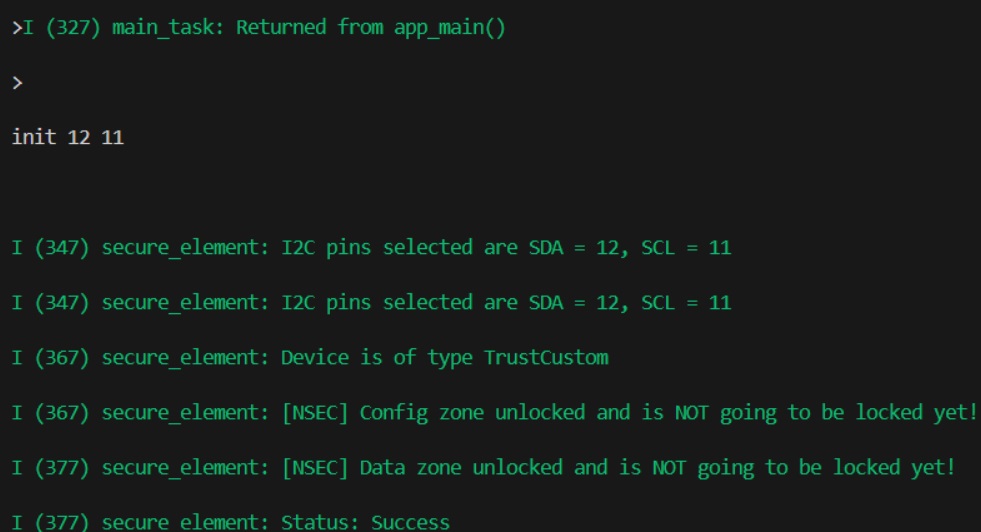
After connecting the ATECC608B to the devkit, I started off with an init 12 11 to make sure things were ready.
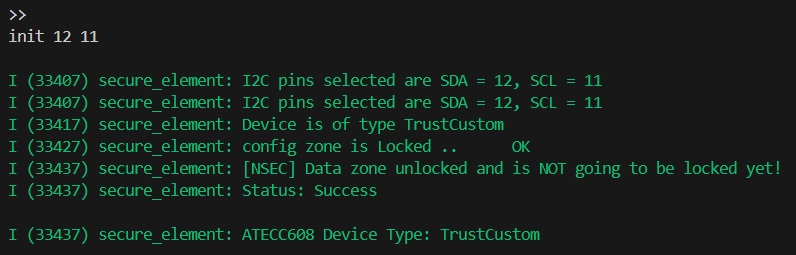
That looks as expected. Let’s trigger the nsec_lock_data now.
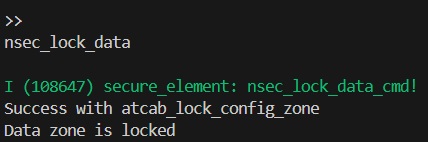
I guess I can’t ask for a cleaner output. In theory at this point we are done. The last thing to do is connect the ATECC608B back to the custom addon, and validate. So let’s see if our efforts worked out!
Full Validation
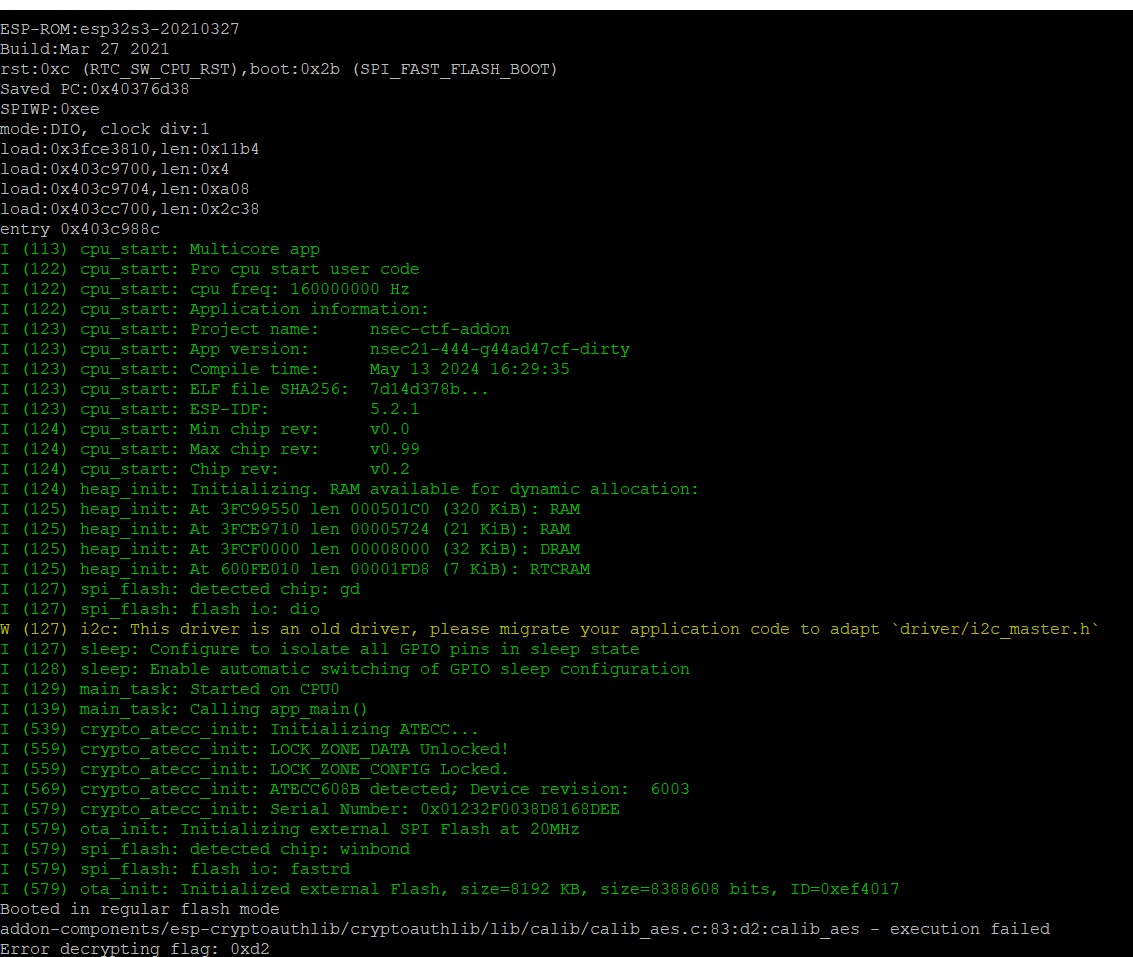
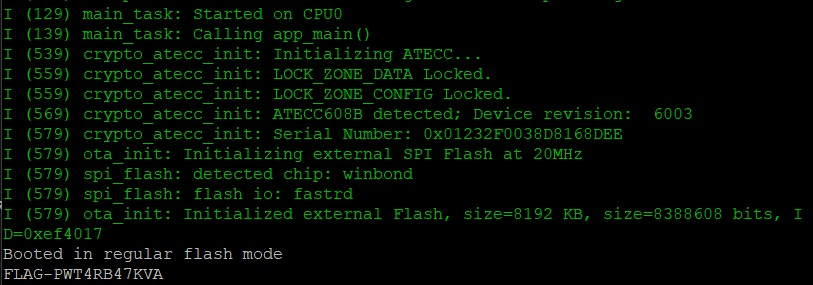
Right away we can tell we are getting somewhere. Connecting to the terminal, we see the LOCK_ZONE_DATA is locked, and where we previously saw a decryption error during the boot sequence, we see something slightly different now - the boot flag.
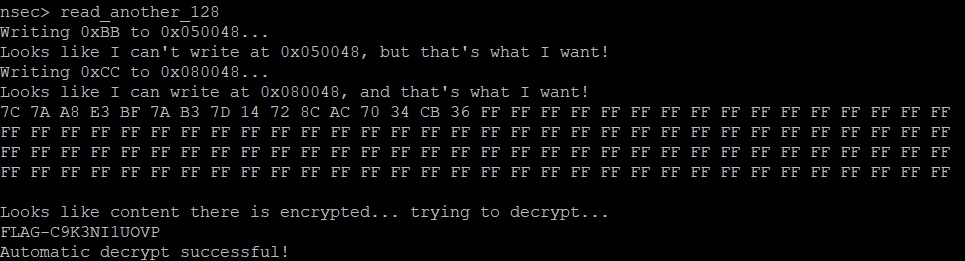
Similarly, for the read_another_128 function, while previously we were able to read the flash memory location, it was not able to decrypt the flag. I validated that the function now successfully decrypts the flag.
Stepping through the remaining crypto operations they all similarly operate as expected from the NSEC CTF experience. At this point I’m good calling this a successful phospholipid addon clone!
Summary
What a journey! I learned a ridiculous amount from the NSEC track alone, but a seemingly simple act like providing a DIY kit with spare parts kicked off a learning journey the last few months that will hopefully only grow from here. I still can’t thank NSEC for the opportunities over the last several years to get hands-on with hardware where otherwise I may not have had a chance. I also need to thank Jonathan Marcil, not only for building this awesome track, and having the foresight to help expand knowledge, but for entertaining my discussions, and helping me where I needed a little guidance on how to move forward. I can confidently say I knew very little before this project, and coming out of it I feel much more comfortable working with the ESP IDF toolset.
Also, I want to call back to the initial section of this post. Personally stepping through solving the original track and building my own variant of the addon was fantastic, but I had just as much fun, if not even more, helping facilitate the Montrehack event and helping others start their own journeys of learning through this awesome track. This was one of the first times I stepped into the role, but definitely not the last - I hope to have more updates in the coming months that I can share. Until then, keep hungry and keep learning!
Thanks folks, until next time!