
Introduction
![]()
Another year, another NorthSec, another game emulation challenge - and I couldn’t be happier. Even in the middle of a heated competition the moment I saw that we would be working with a Nintendo 64 game / architecture in general I put other challenges on the back-burner to jump right in.
In previous years I had a chance to work with similar styled gaming challenges - more pointedly referencing my Dreamcast writeup. At the time this was a good introduction for me to game debugging and stepping through the various architectural components. Fast-forward to the 2022 edition and now I have another chance to improve my knowledge - this time with my first major childhood gaming system.
I ended up solving this challenge purely with static analysis. The only interaction with the game in action was actually playing it as an end-user. Focusing on the static analysis part helped me drill down to parts of Ghidra and reverse engineering I hadn’t done before and in general build on the initial knowledge I’ve gained in previous years. After the CTF completed I discussed with a few others who had approached it from a dynamic debugging perspective and I am excited to round off the knowledge by reading their walkthroughs as well.
With that said let’s jump right in!
Initial Investigation
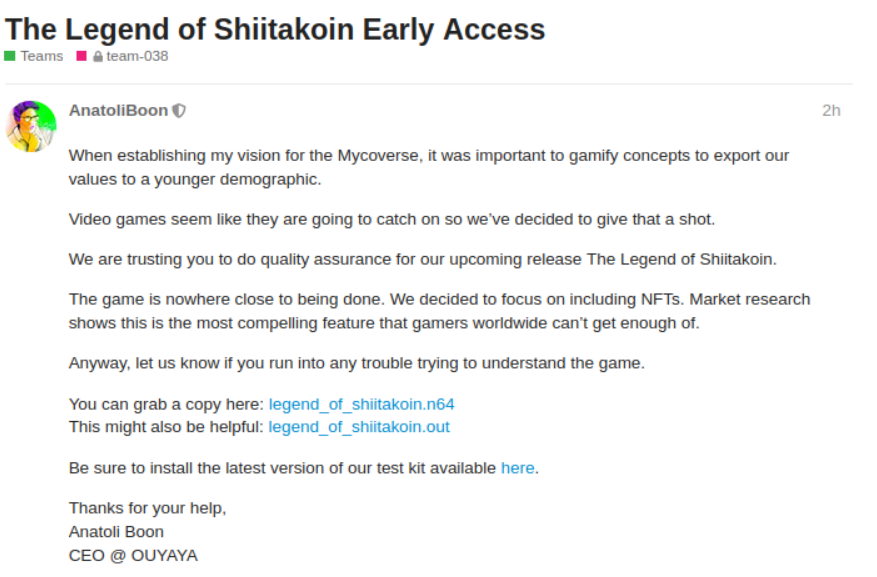
Ah the NFT craze. Alright CEO Anatoli, I’m happy to go through your product demo and see what I can find. The Ouyaya company provides us with two files related to the game itself, and a “test kit”, which ended up being a version of Project64.
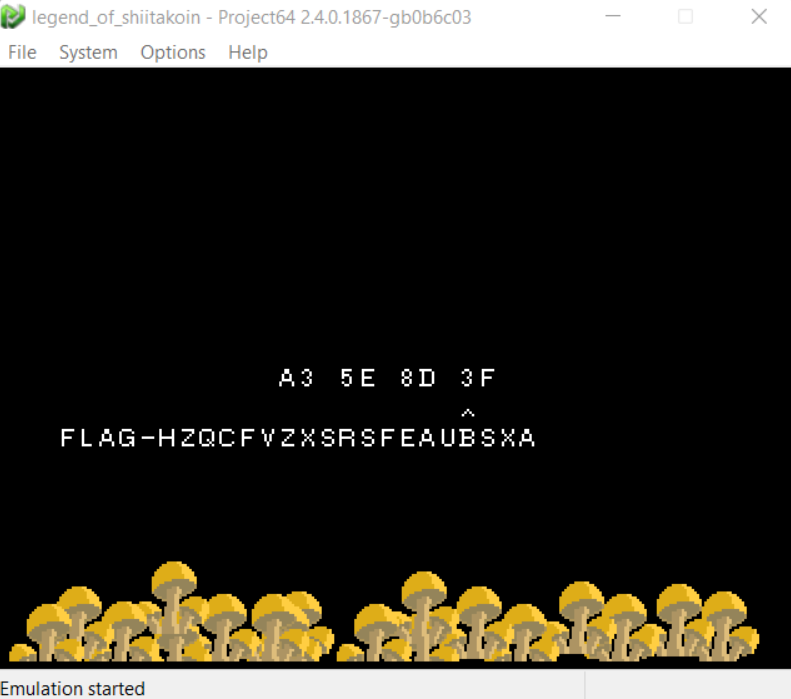
Before going into any form of reverse engineering, let’s simply look at what we are dealing with by booting up the .n64 file in Project64.
The main points I see right at the start:
- Looks like there are three screens only. It keeps moving between the intro and then two game screens.
- Persistence does not seem to happen while moving between screens. Any value left was reset when coming back around.
One of the first questions that came to mind is whether this was one challenge with two components, or two separate challenges. Ultimately it wouldn’t matter since I need to solve it anyways, however on seeing the values be wiped my gut said it was two separate and distinct parts.
Ghidra
Ghidra by default doesn’t work well with N64 roms. A quick google search and I stumbled on to N64LoaderWV - a Ghidra plugin that takes care of fixing endian-ness, loading the appropriate ram/room/boot sections, and provides an ability to load symbols from a signature file. While I didn’t end up using the signature load of the plugin since I went about it a different way, the plugin really provided everything in a single package if one wanted to approach it that way.
Blind Searching
Alright with the plugin installed, let’s load the ROM and see what we are working with.
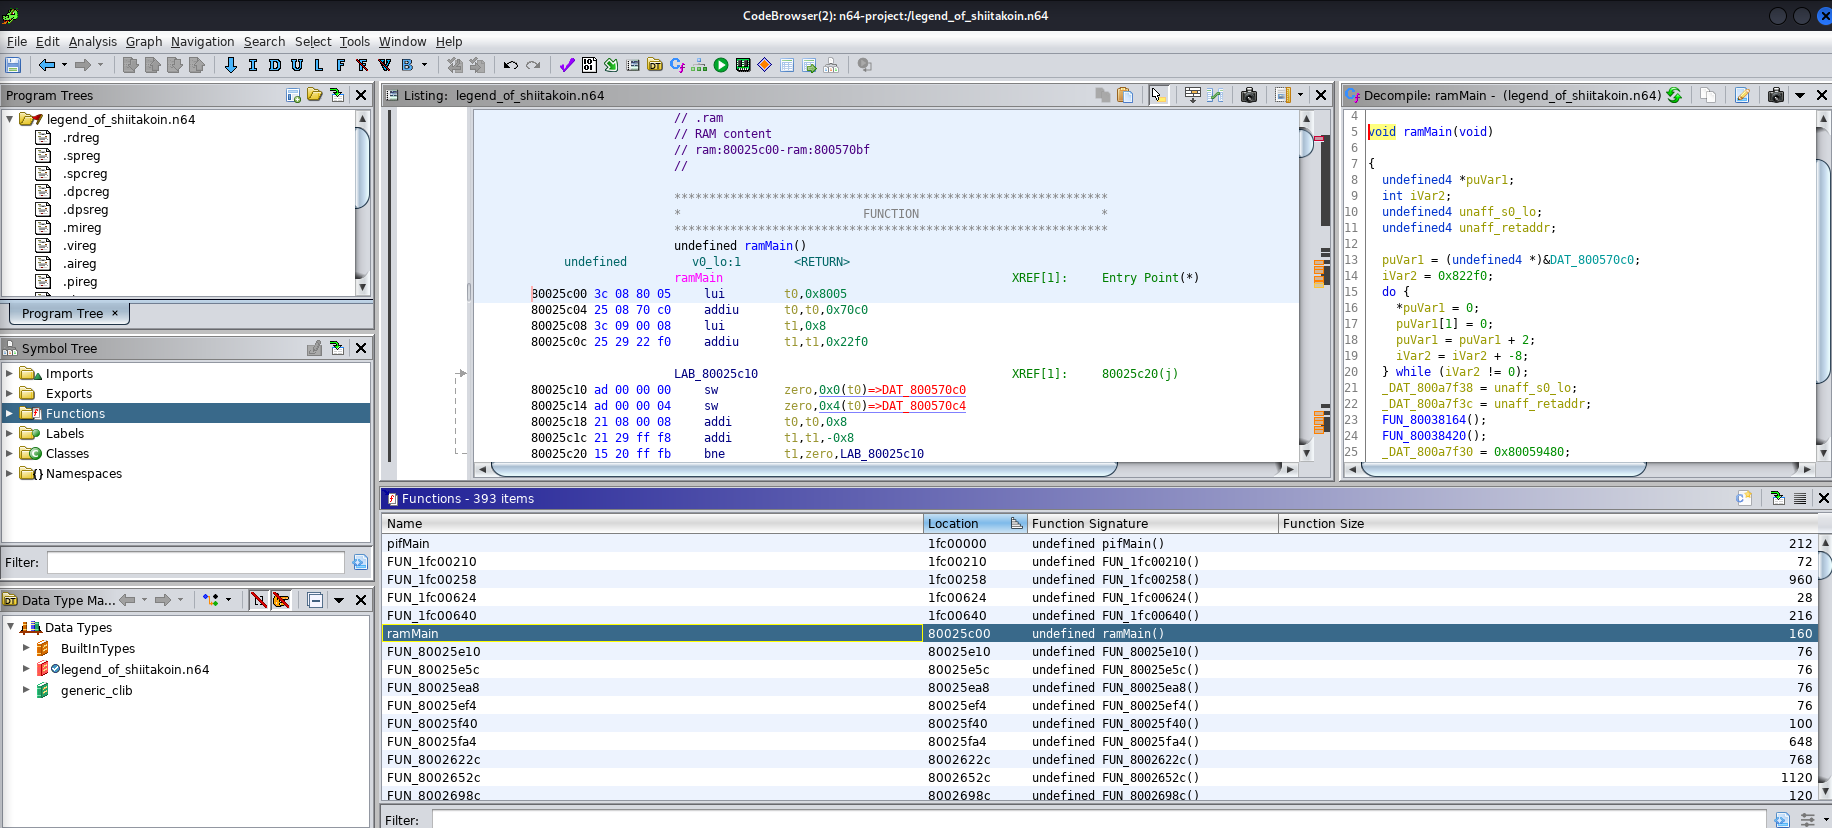
So far so good, although it isn’t very clear as to what is happening. Most of the functions are FUN to deal with (been a long CTF weekend so excuse the puns). While the challenge is still doable in this state, we were provided another interesting file. So let’s take a look at that quickly before making our lives harder and trying to do it blindly.
Debug Symbols
Shifting focus let’s see what we are working with in the second file they provided.
file legend_of_shiitakoin.out
legend_of_shiitakoin.out: ELF 32-bit MSB executable, MIPS, MIPS-I version 1 (SYSV), statically linked, not stripped
Alright call me interested. I had a hunch that this was a game dump with debug symbols so I checked if that was indeed the case. Sure enough looked good!
readelf -s legend_of_shiitakoin.out | head -n 20
Symbol table '.symtab' contains 1212 entries:
Num: Value Size Type Bind Vis Ndx Name
0: 00000000 0 NOTYPE LOCAL DEFAULT UND
1: 00000000 0 SECTION LOCAL DEFAULT 1 ..code
2: 00000000 0 SECTION LOCAL DEFAULT 2 ..code.bss
3: 00000000 0 SECTION LOCAL DEFAULT 3 .reginfo
4: 00000000 0 SECTION LOCAL DEFAULT 4 .debug
5: 00000000 0 SECTION LOCAL DEFAULT 5 .debug_srcinfo
6: 00000000 0 SECTION LOCAL DEFAULT 6 .debug_aranges
7: 00000000 0 SECTION LOCAL DEFAULT 7 .debug_pubnames
8: 00000000 0 SECTION LOCAL DEFAULT 8 .debug_sfnames
9: 00000000 0 SECTION LOCAL DEFAULT 9 .line
10: 00000000 0 SECTION LOCAL DEFAULT 10 .comment
11: 00000000 0 SECTION LOCAL DEFAULT 11 .mdebug
12: 00000000 0 SECTION LOCAL DEFAULT 12 .shstrtab
13: 00000000 0 SECTION LOCAL DEFAULT 13 .symtab
14: 00000000 0 SECTION LOCAL DEFAULT 14 .strtab
15: 00000000 0 FILE LOCAL DEFAULT ABS main.c
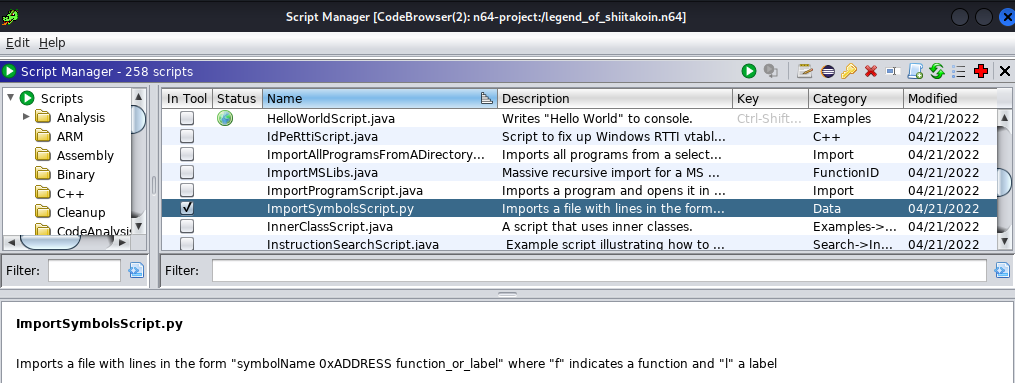
16: 80025c60 0 OBJECT LOCAL DEFAULT 1 gcc2_compiled.Here is where I diverged from the N64 plugin itself. Instead of using its symbol loading functionality I ended up going with ImportSymbolsScript.py.
This required tweaking the output of readelf a bit, but after a few tweaks I ended up with a file of format:
..code 00000000
..code.bss 00000000
.reginfo 00000000
.debug 00000000
.srcinfo_debug 00000000
.aranges_debug 00000000
.pubnames_debug 00000000
.sfnames_debug 00000000
.line 00000000
.comment 00000000
.mdebug 00000000
.shstrtab 00000000
.symtab 00000000
.strtab 00000000
.compiled_gcc2 80025c60
.compiled_gcc2 80025f40
x 800570c8
y 800570cc
b 800570d0
x_triPos 800570c0
…and was ultimately successful in loading that in.
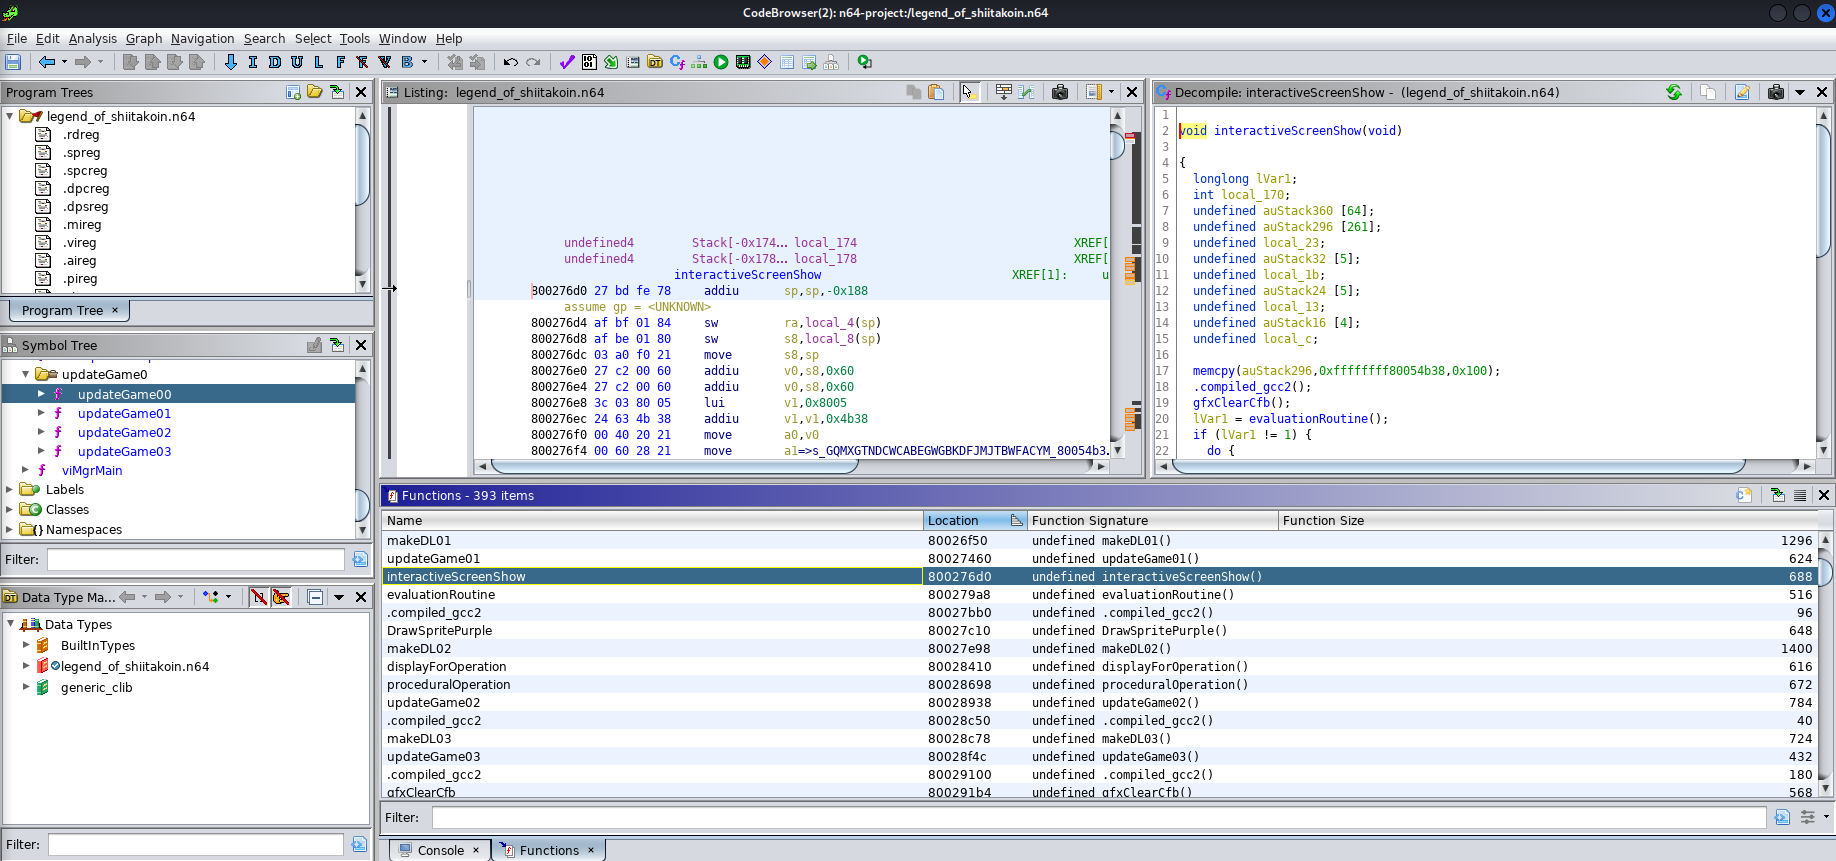
That makes things MUCH easier to work with. We clearly see the functions corresponding to our game screens and other supporting functions are similarly named and clarified. Ok we should be in a position to start tackling the actual challenges now.
Game1 - Trust the Decompiler
After a bit of poking around I started understanding the naming. updateGame01 referred to our first combination game and updateGame02 referred to our floating mushroom NFT game. That also indicates there was an easter egg in updateGame03 with an unfinished game screen! We still have two to solve however, so let’s focus there for now.
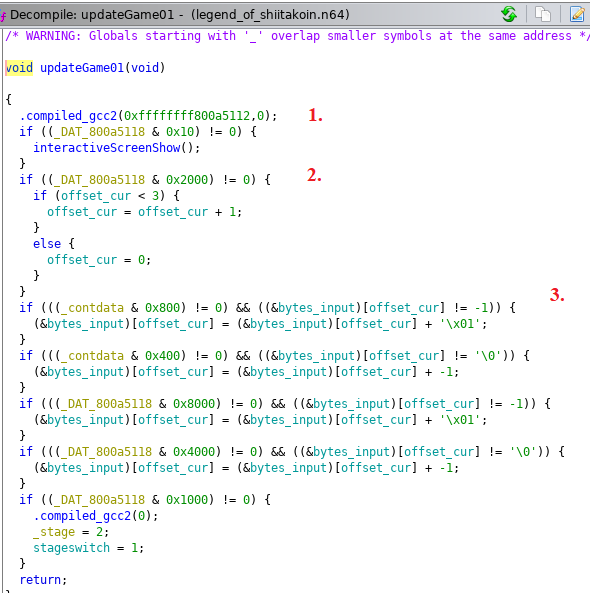
Without understanding each value directly we can pretty much figure out the flow that is happening here. DAT_800a5118 seems to refer to button presses with the value representing specific buttons. Having played the game I was able to see where the values are going up/down either in individual steps, or constant steps. Specifically, the important parts to me were:
- The trigger that looks at our input and displays our “INCORRECT” value
- The ability to move an
offsetfrom 0-3. - That our input value is stored in
bytes_inputand looks like it represents the 4 bytes of data.
Starting to have a better idea of how this works. Let’s go a step deeper now and see how the interactiveScreenShow function works.
interactiveScreenShow

The first thing it does seems to call an evaluateRoutine function. Before jumping straight into there let’s keep looking at this function. Once done with the eval, it checks lvar1 to see if it is 1. This is a point worth explaining as it determined how we could solve the challenge. With minor spoilers you can pretty much assume that if we were to put the right code in, evaluateRoutine would return 1. Following the code for when the return isn’t 1 we quickly see that it leads to the “INCORRECT” output.
Great, we know where the logic branch is, can’t we just skip over it/patch the binary and call it a day? Here is where section numbered 2 comes into play. Even if we were to bypass the evaluation, we see that the game is taking our input, manipulating it around a bit into the auStack variable, and then ultimately displaying it on the game screen. So although we can get it to display “FLAG-xxxxxxx” it wouldn’t be the right flag as it is dependent on our input. Sure enough this was also confirmed earlier on when I did a strings run on the file.

Alright no easy bypassing this time. Let’s go to the eval function and see what we can find!
evaluateRoutine
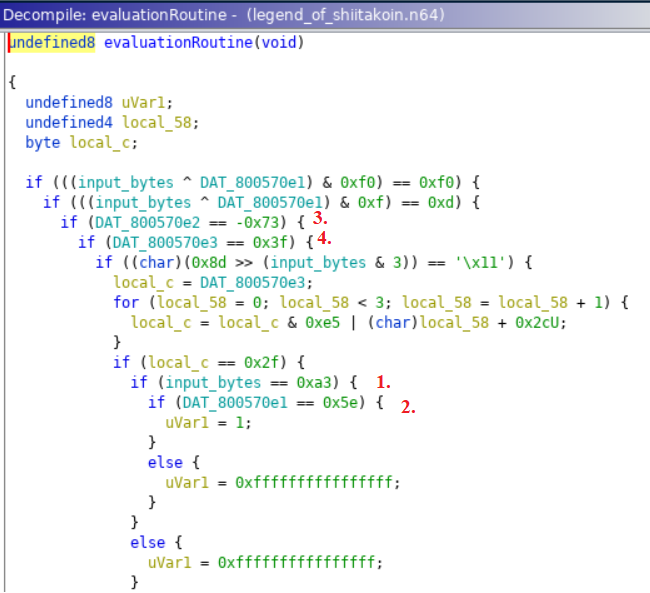
At first glance it might seem a bit convoluted but if you follow the nested statements it is logical. We sure enough see a single uVar1 = 1 statement if all the conditions are met. The last part we need is to understand (by hovering over in Ghidra) input_bytes and see that it had an address of 80057e0. If you combine that with the e1, e2, e3 variables as well, we can see that they are individual bytes of our input.
While you could go through the logic start to end, I noticed there was a shortcut. While there are a few more complicated portions of the logic check, each input had an individual check as well. Since we were not modifying the actual input this should in theory reflect the exact value required.
- First value would be
A3 - Second would be
5E - Third would be
8D. Ghidra represented it as -73, however a quick hover showed the proper value - Fourth would be
3F
Victory
With a code believed to be correct, only thing left was to give it a try!


Excellent. One down, one to go. Let’s move on to our shroom NFT.
Game2 - Follow the Bouncing Bit
With all the prep work done above we should be able to jump right into evaluateGame02 and start our analysis. Let’s see what we are working with.

Alright similar style of controls. We can see in section 1 that pressing our buttons will manipulate the x and y between 0 and 0xFF, storing it in two separate variables. The second section then loads the values into temporary variables and calls another evaluate function, then again similar to the first game checks if the output is 1. So far it looks like a similar flow to the first game, so let’s take a poke at the proceduralOperation function.
proceduralOperation
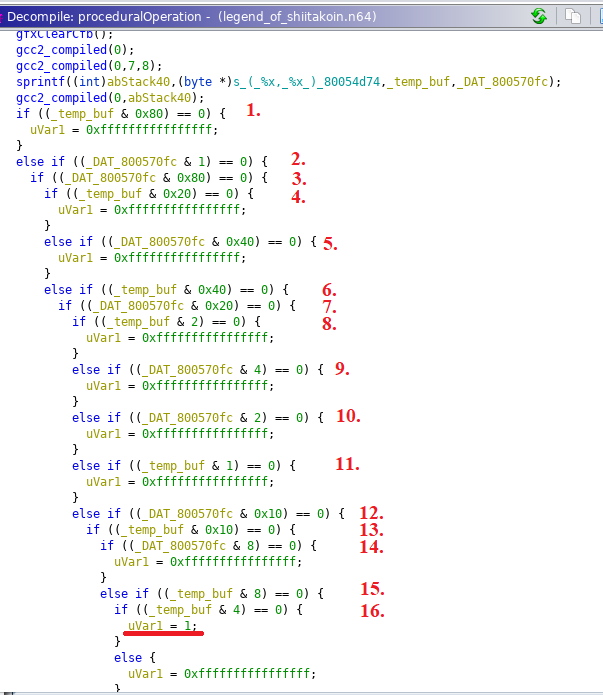
Pretty much what was expected. A longer nested logic loop where there is a single branch that leads to uVar1 = 1. Since we know that tempbuf corresponds to our x input and DAT_800570fc corresponds to our y input, you can probably see what needs to happen here. But in the interest of learning let’s go a bit deeper.
Opcode Deepdive
I’ve had mixed results with previously trusting Ghidra’s decompile for game ROMs (cough… NSEC 2020 Dreamcast) so I took a bit of a longer, but confirming approach to solving this part. Let’s look at the machine code for the first evaluation
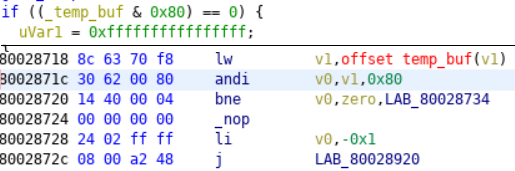
Ok, that looks straight forward.
- Load word of our input into v1
- “andi” it with 0x80 and store in v0
- Branch (or jump) to an address if it is not equal to 0
- Otherwise, set v0 to -1 and jump
While I suspected andi would be a bitwise operator, with that 2020 burn in the back of my mind I went ahead and confirmed directly.
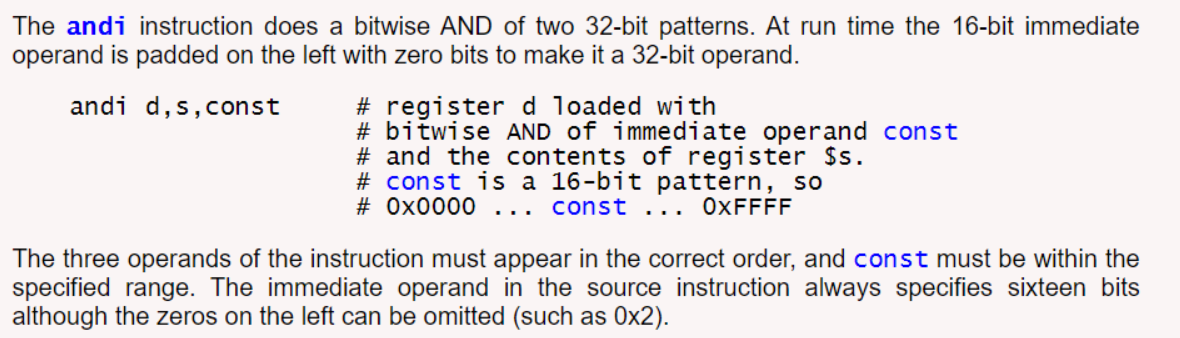
Excellent, so our assumptions are correct and essentially each evaluation in the larger proceduralOperation function is looking at a single bit of our input coordinate byte.
Building the code
Understanding each of the 16 evaluations is looking at a specific bit of the 2 input bytes, we can then rebuild the correct code, bit-by-bit if go down the list. I was marking it one eval at a time in more english terms.
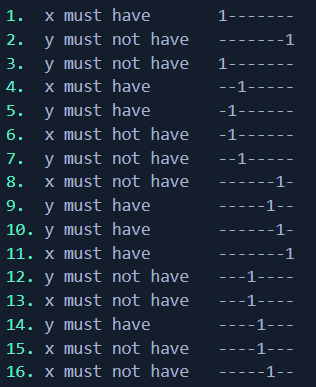
And when we put it all together we get our code:
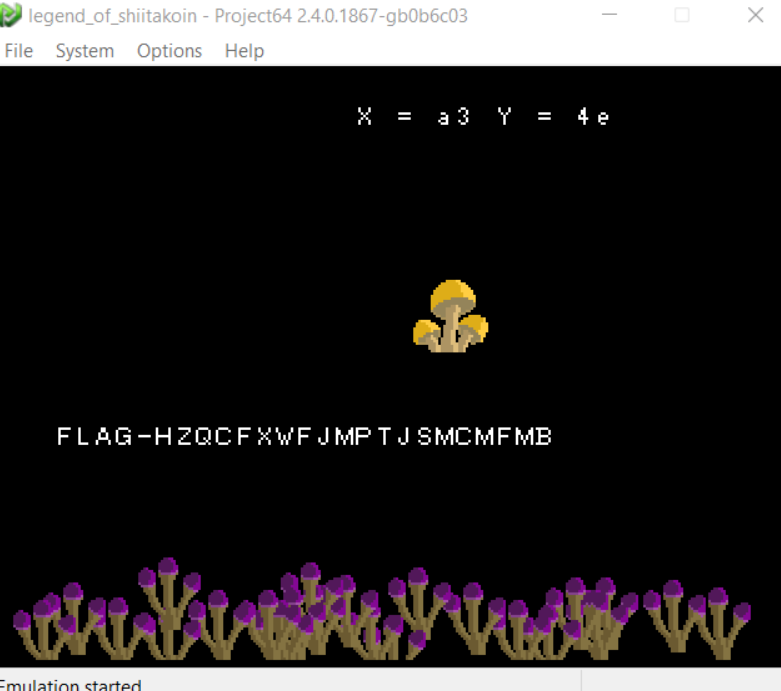
x = 10100011 = A3
y = 01001110 = 4E
Victory
And that is left is to confirm our approach made sense and get rewarded for it!


Summary
Well thus comes to end yet another amazing NSEC ROM reversing challenge. I can’t thank the author, Zack Deveau, enough for providing us an opportunity to dive deeper into the gaming world and develop our RE skills further. These types of challenges tug at my heart strings, as not only do I love a good RE, but this brought back nostalgic childhood memories of playing Zelda:OOT on the N64, being amazed at such advanced 3D graphics, and having that childhood wonder of how it all worked together. A short 20+ years later I can say I understand that just a little bit better now, in no small part thanks to challenges like this.
To those that have made it to the end, hopefully you enjoyed the writeup and learned something along the way. Looking forward to talking, and seeing, many of you at next year’s NSEC event!
Thanks folks, until next time!